Use this information to replace the 3.5-inch simple-swap backplate assembly/hot-swap hard disk drive backplane.
To install the 3.5-inch simple-swap backplate assembly/hot-swap hard disk drive backplane, complete the following steps:
- Read the safety information that begins on Safety and Installation guidelines.
- Turn off the server, and disconnect all power cords and external cables.
- Remove the top cover (see Removing the top cover).
- Pull the hard disk drives or fillers out of the server slightly to disengage them from the backplate assembly/backplane. See Removing a hot-swap hard disk driveand Removing a simple-swap hard disk drive for details.
- Remove the fan cage assembly (see Removing the fan cage assembly).
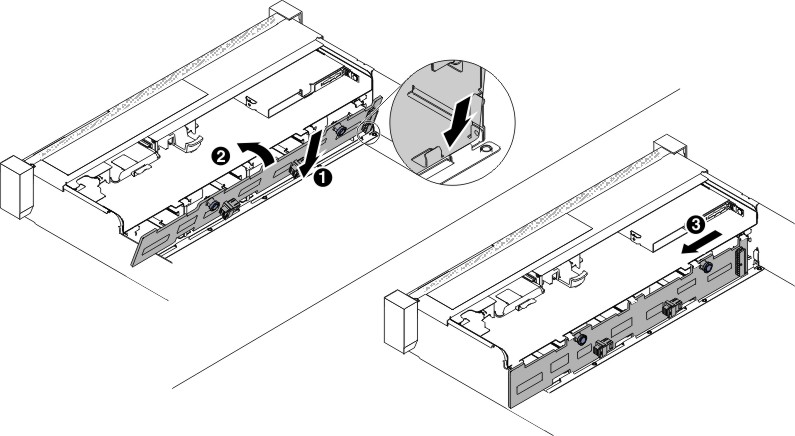
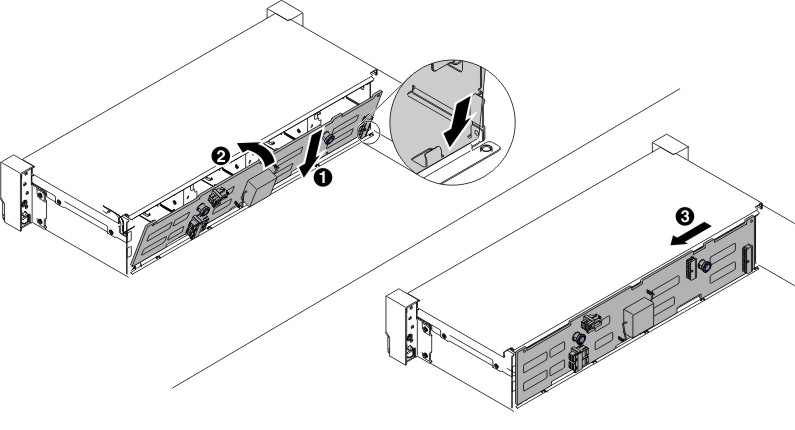
- 1 Insert the backplate assembly/backplane tabs
into slots on the bottom of the drive cage at an angle; then, 2 rotate the backplate assembly/backplane toward the front the
server.
Note: You can connect the cables to the drive backplate assembly/backplane before installing the backplate assembly/backplane onto the cage or you can connect the cables after you install the backplate assembly/backplane, if that is easier for you.
- 3 Push the backplate assembly/backplane to the
left to engage the assembly into place.
- For eight 3.5-inch simple-swap backplate assembly/hot-swap hard
disk drive backplaneFigure 1. Eight 3.5-inch simple-swap backplate assembly/hot-swap hard disk drive backplane

- For twelve 3.5-inch hot-swap hard disk drive backplaneFigure 2. 3.5-inch hot-swap hard disk drive backplane installation

- For eight 3.5-inch simple-swap backplate assembly/hot-swap hard
disk drive backplane
- Connect the signal and power-configuration cables to the backplane and the system board. See 3.5-inch hard disk drive cable connection for more information.
- Reinstall the hard disk drives and filler panels (see Replacing a simple-swap hard disk drive).
- Replace the fan cage assembly and fans if you removed them (see Replacing the fan cage assembly and Replacing a hot-swap fan).
- Install the top cover (see Replacing the top cover).
- Slide the server into the rack.
- Reconnect the power cords and any cables that you removed.
- Turn on the peripheral devices and the server.