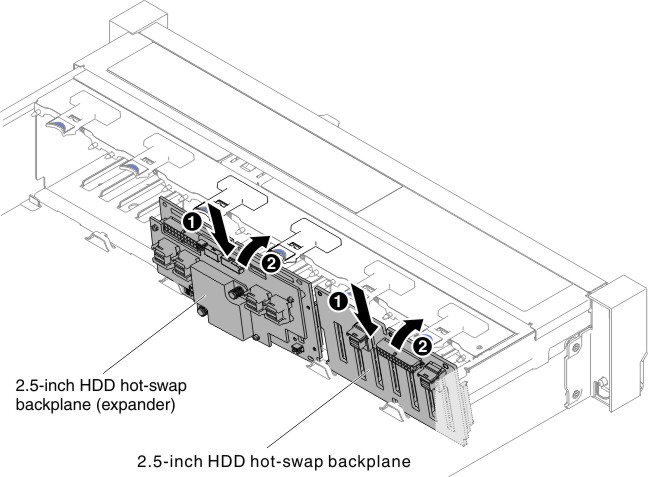
Use this information to replace the 2.5-inch simple-swap backplate assembly/hot-swap hard disk drive backplane.
To install the 2.5-inch simple-swap backplate assembly/hot-swap hard disk drive backplane, complete the following steps:
- Read the safety information that begins on Safety and Installation guidelines.
- Turn off the server, and disconnect all power cords and external cables.
- Remove the top cover (see Removing the top cover).
- Pull the hard disk drives or fillers out of the server slightly to disengage them from the backplate assembly/backplane. See Removing a hot-swap hard disk drive and Removing a simple-swap hard disk drive for details.
- Remove the fan cage assembly (see Removing the fan cage assembly).
- Insert the backplate assembly/backplane tabs into slots
on the bottom of the cage and push the backplate assembly/backplane
forward into the release latch (on top of the backplate assembly/backplane
cage) until the backplate assembly/backplane is locked in place.
Note: You can connect the cables to the drive backplate assembly/backplane before installing the backplate assembly/backplane onto the cage or you can connect the cables after you install the backplate assembly/backplane, if that is easier for you.Figure 1. 2.5-inch simple-swap backplate assembly/hot-swap hard disk drive backplane installation

- Connect the SAS signal and power/configuration cables to the backplate assembly/backplane and the system board. See 2.5-inch hard disk drive cable connection for details.
- Replace the fan cage and fans if you removed them (see Replacing the fan cage assembly and Replacing a hot-swap fan).
- Reinstall the hard disk drives (see Replacing a hot-swap hard disk drive).
- Install the top cover (see Replacing the top cover).
- Slide the server into the rack.
- Reconnect the power cords and any cables that you removed.
- Turn on the peripheral devices and the server.