You can replace either of the two hot-swap redundant power
supplies in an enclosure. These redundant power supplies operate in
parallel, one continuing to power the canister if the other fails.
DANGER
When working on or around the system, observe
the following precautions:
Electrical voltage and current from power, telephone, and communication
cables are hazardous. To avoid a shock hazard:
Attention: Even though many of these components are hot-swappable, they are
intended to be used only when your system is not active (no I/O operations). If your system
is powered on and processing I/O operations, go to the management GUI and follow the fix procedures. Initiating the replacement actions
without the assistance of the fix procedures can result in loss of
data or loss of access to data.
Be careful when
you are replacing the hardware components that are located in the
back of the system that you do not inadvertently disturb or remove
any cables that you are not instructed to remove.
Ensure that you are aware of the procedures for handling static-sensitive
devices before you replace the power supply.
Attention: Do not remove a power supply unit
from an active enclosure until a replacement power supply unit is
ready to be installed. While a power supply unit is not installed,
airflow through the enclosure is reduced and the enclosure can overheat.
It is recommended that a replacement power supply is fitted within
5 minutes of replacing a faulty unit. Ensure that you have read and
understood these instructions, and have the replacement available
and unpacked before you remove the existing power supply.
To replace the power supply, perform the following steps:
- Read the safety information in Preparing to remove and replace parts.
- Confirm that you know which power supply needs to be replaced.
Go to Procedure: Identifying which enclosure or canister to service.
- Disconnect the power cord from the electrical outlet and
the power supply that you are replacing.
- On the left side of the power supply, press the orange
release tab to the right just enough to release the handle (no more
than 6 mm [0.25 in.]) as you rotate the handle downward.
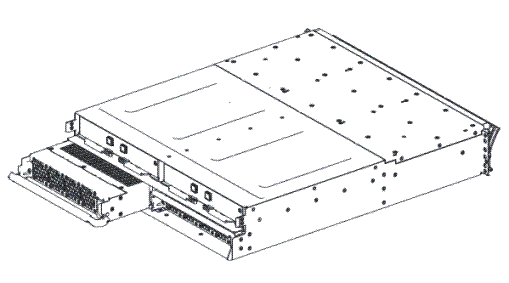
- Using the handle, gently slide the power supply out of
the enclosure.
Figure 1. Removing the power supply unit from the left side of the enclosure

- Hold the new power supply so that the handle is fully extended.
- Gently slide the power supply into the enclosure until
it stops. Rotate the handle upward into the closed position until
it clicks.
- Connect the power cord to the power supply and to a properly
grounded electrical outlet.
Note: After the power cord is connected to the electrical
outlet, make sure that the AC power (green) LEDs are lit and the fault
(amber) LED is off.
