Use this information to replace the LCD system information display panel.
Note: The LCD system information display panel is available
on some models.
Replacing the LCD panel assembly on a 3.5-inch
modelTo install the LCD panel assembly on a 3.5-inch model, complete the following steps.
- Read the safety information that begins on Safety and Installation guidelines.
- Turn off the server and peripheral devices and disconnect the power cords and all external cables, if necessary.
- Remove the top cover (see Removing the top cover).
- Remove the fan cage assemblyRemoving the fan cage assembly).
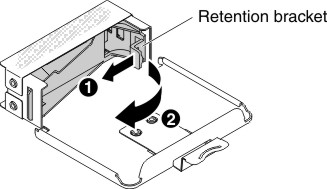
- 1 Pull the tab on the LCD retention bracket to the left
to disengage the retention bracket. 2 Rotate the retention
bracket to remove it from the server.Figure 1. Retention bracket removal
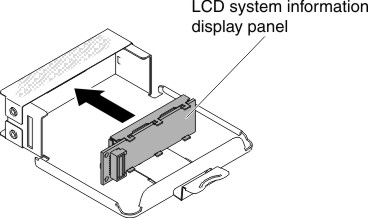
- Carefully insert the LCD system information display panel into
place.Figure 2. LCD system information display panel installation
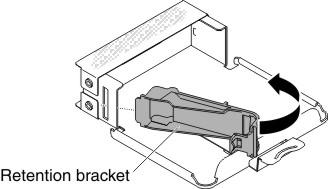
- Hinge the retention bracket into the slot on the LCD panel assembly
and rotate it until it clicks into place.Figure 3. Retention bracket installation
- Connect the cable to the rear of the LCD system information display panel.
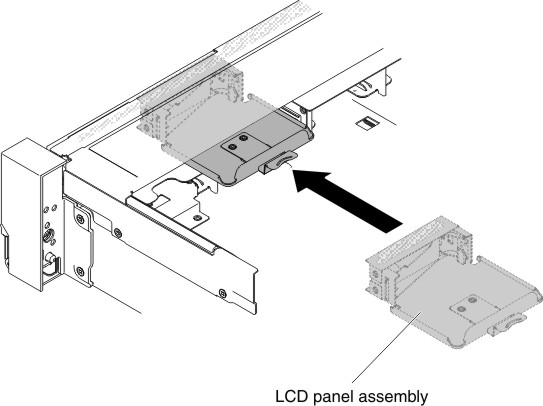
- Slide the LCD panel assembly into the server until it clicks into
place.Figure 4. LCD panel assembly installation
- Connect the LCD panel assembly cable to the system board.
The following illustration shows the cable routing for the LCD panel assembly.
Figure 5. LCD panel assembly cable routing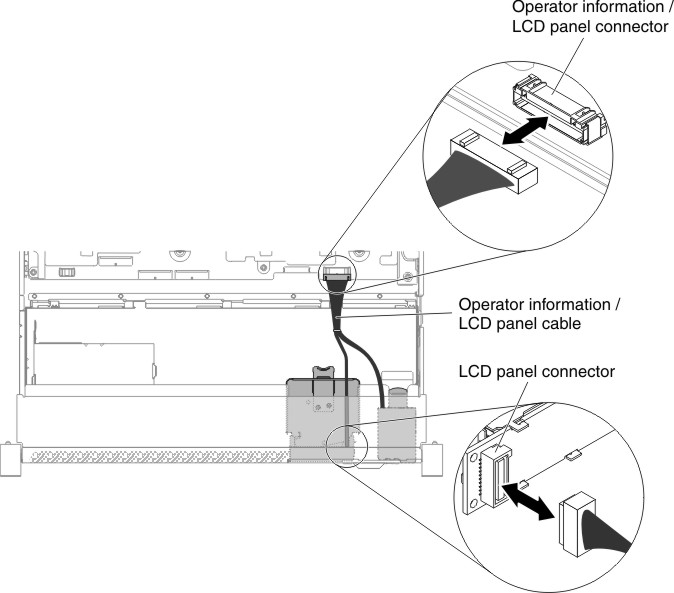
Note: To connect the LCD panel assembly cable on the system board, press evenly on the cable. Pressing on one side of the cable might cause damage to the cable or connector. - Replace the top cover (see Replacing the top cover).
- Slide the server into the rack.
- Reconnect the power cords and any cables that you removed.
- Turn on the peripheral devices and the server.
Replacing the LCD system information display panel on a 2.5-inch model
To install the LCD system information display panel into a media cage that is pre-configured without a LCD system information display panel on a 2.5-inch model, complete the following steps.
- Read the safety information that begins on Safety and Installation guidelines.
- Turn off the server and peripheral devices and disconnect the power cords and all external cables, if necessary.
- Remove the top cover (see Removing the top cover).
- Remove the fan cage assemblyRemoving the fan cage assembly).
- Remove the media cage (see Removing the media cage (also called lightpath LCD operation panel assembly)),
- A separate bezel is needed if your media cage has a bezel without
the opening and buttons for the LCD panel, To remove the media cage
bezel, complete the following steps:
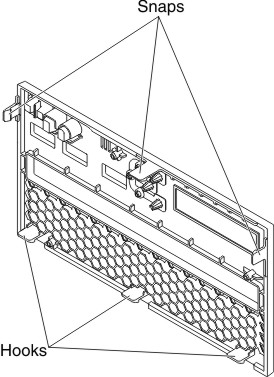
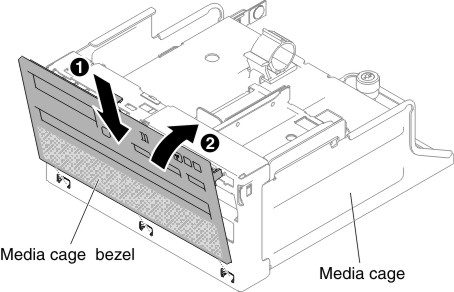
- Disengage the three snaps on the media cage bezel from the media
cage. The following illustration shows the location of three snaps. Figure 6. Snaps (the rear side of the media cage)
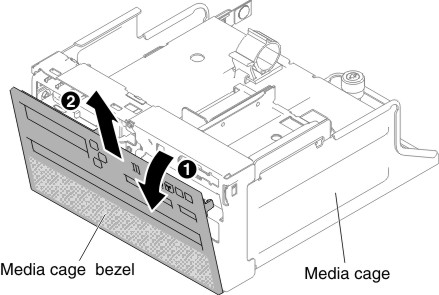
- Lift the bezel upwards; then, pivot and rotate the bezel along
the hooks to remove it from the media cage.Figure 7. Media cage bezel removal
- Disengage the three snaps on the media cage bezel from the media
cage. The following illustration shows the location of three snaps.
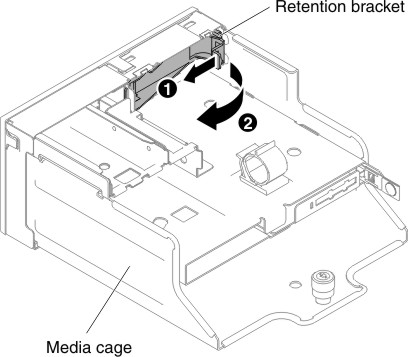
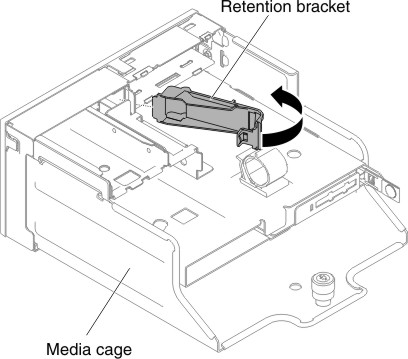
- 1 Pull the tab on the LCD retention bracket to the left
to disengage the retention bracket. 2 Rotate the retention
bracket to remove it from the server.Figure 8. Retention bracket removal
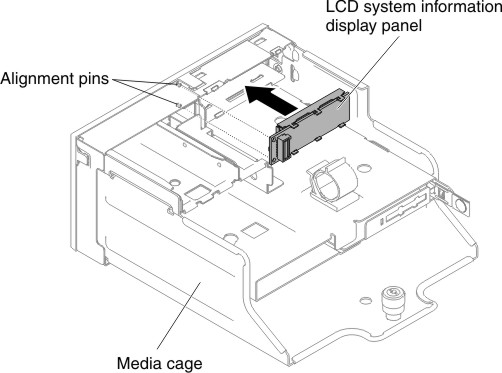
- Carefully insert the LCD system information display panel into
place.Figure 9. LCD system information display panel installation
- Insert the retention bracket into the slot on the media cage and
push it until it clicks into place. Figure 10. Retention bracket installation
- If you have removed the media cage bezel, install the new media
cage bezel with LCD opening and buttons. Angle the media cage bezel
and insert the three hooks on the rear side of the media cage bezel
into slots on the media cage. The following illustration shows the
location of three hooks. Figure 11. Hooks (the rear side of the media cage)
- Rotate the media cage bezel and snap it into place.Figure 12. Retention bracket installation
- Install the media cage (see Replacing the media cage (also called lightpath LCD operation panel assembly)).
- Replace the top cover (see Replacing the top cover).
- Slide the server into the rack.
- Reconnect the power cords and any cables that you removed.
- Turn on the peripheral devices and the server.