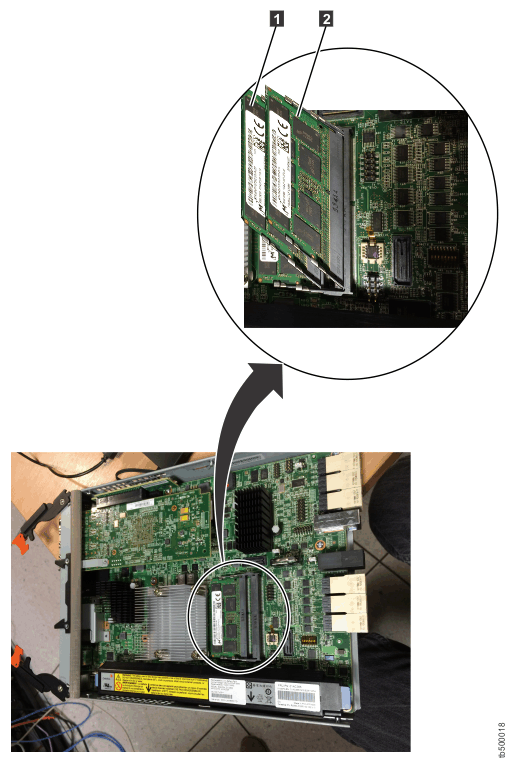
For Lenovo Storage V3700 V2 XP, you can upgrade the amount of canister memory from 8 Gb to 16 Gb. For a Lenovo Storage V5030 system, you can upgrade the amount of canister memory from 16 Gb to 32 Gb.
- Follow Procedure: Removing a node canister to disconnect and remove the node canister that you want to upgrade.
- Remove the lid of the canister, as described in Procedure: Removing and replacing lid of a node canister.
- Locate the DIMM slots:Slot 1 is next to the CPU. Slot 2 is next to the battery area. A new stick of memory is added into the empty slot that sits above the stick that is already installed.
- Ensure that the retaining clips of the DIMM slot are open.
- Gently place the DIMM in the slot and ensure that the notches
in the DIMM align with the shape of the slot.Installing a DIMM shows installing a DIMM.
- Apply even, firm, downwards pressure on the DIMM in its slot until the retaining clips move inwards and engage the edges of the DIMM.
- Ensure that the retaining clips are fully engaged with
the edges of the DIMM.Gently pull the DIMM upwards and ensure that it does not become dislodged.Figure 1. Installing a DIMM

- Replace the canister lid, as described in Procedure: Removing and replacing lid of a node canister.
- Reinstall the canister into the enclosure from which it
was removed in step #tb5_upg_nodecan_ram/remove_node_canister.When the canister is reinserted and powered on, it has an 841 error.
- Follow the directed maintenance procedure (DMP) to accept
the new memory. The canister restarts and comes back online configured with 16 Gb or 32 Gb of RAM depending on the Lenovo Storage V series system that you are upgrading.
- Reconnect the cables to the canister, ensuring that cables go into the same ports from which they were removed in step #tb5_upg_nodecan_ram/remove_node_canister.