Replacing a RAID adapter battery/flash power module

Use this information to replace a RAID adapter battery/flash power module.

To install a RAID adapter battery/flash power module in the server, complete the following steps:

  1. Read the safety information that begins on Safety and Installation guidelines.
  2. Turn off the server and peripheral devices and disconnect all power cords and external devices.
  3. Remove the top cover (see Removing the top cover).
  4. Install the ServeRAID adapter on the system board (see Replacing an adapter) or install the ServeRAID adapter on the riser card and install the riser-card assembly in the server (see Replacing an adapter).
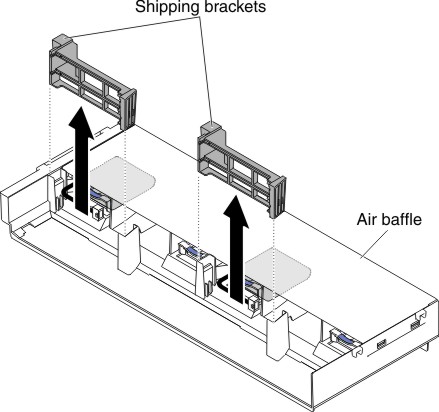
  5. If the flash power modules are located behind the full-height, full-length adapters, remove the two shipping brackets first.
    Figure 1. Shipping bracket removal
    Shipping bracket removal
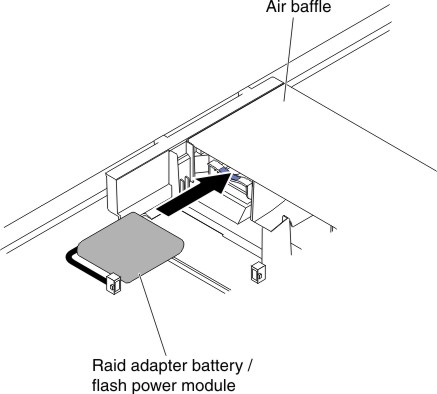
  6. Align the battery/flash power module with the slot and push the battery into the battery/flash power module holder and make sure that the holder retains the battery/flash power module securely.
    Figure 2. RAID adapter battery/flash power module installation
    RAID adapter battery/flash power module installation
  7. Connect the battery/flash power module cable to the RAID adapter battery/flash power module connector.
    Attention: Make sure that the cable is not pinched and does not cover any connectors or obstruct any components on the system board.
  8. Reinstall the riser-card assemblies if you have remove them. See Replacing an adapter in a riser-card assembly.
    Attention:
    1. Make sure that the cable is not pinched and does not cover any connectors or obstruct any components on the system board.
    2. Make sure the wire cables are routed in the proper locations without blocking the retention brackets installation.
  9. Reinstall the top cover (see Replacing the top cover).
  10. Slide the server into the rack.
  11. Reconnect the power cords and all external cables, and turn on the server and peripheral devices.