Setting the IMM2 date and time
Use the information in this topic to understand IMM2 date and time settings. Instructions are provided to manually change the IMM2 date and time and to synchronize the IMM2 clock with the server clock.
Select the Date and Time tab to view or change the IMM2 date and time. The IMM2 uses its own real-time clock to time stamp all events that are logged in the event log. Alerts that are sent by email and Simple Network Management Protocol (SNMP) use the real-time clock setting to time stamp the alerts. The clock settings support Greenwich mean time (GMT) offsets and daylight saving time for added ease-of-use for administrators who are managing systems remotely over different time zones. You can remotely access the event log even if the server is turned off or disabled.
The IMM2 date and time setting affects only the IMM2 clock and not the server clock. The IMM2 real-time clock and the server clock are separate, independent clocks and can be set to different times.
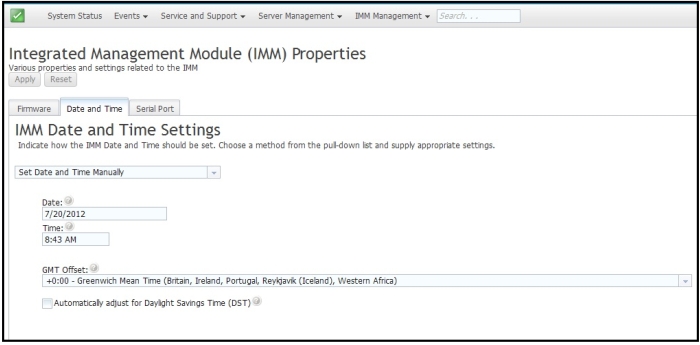
Changing the time and date setting (manual mode)
- From the Indicate how the IMM date and time should be set menu list, click Set Date and Time Manually.
- In the Date field, type the current month, day, and year.
- In the Time field, type the numbers that correspond to the current hour and minutes.
- The hour must be a number from 1- 12 as represented on a 12-hour clock.
- The minutes must be numbers from 00 - 59.
- Select AM or PM.
- In the GMT Offset field, select the number that specifies the offset, in hours, from GMT. This number must correspond to the time zone where the server is located.
- Select or clear the Automatically adjust for Daylight Saving Time (DST) check box to specify whether the IMM2 clock automatically adjusts when the local time changes between standard time and daylight saving time.
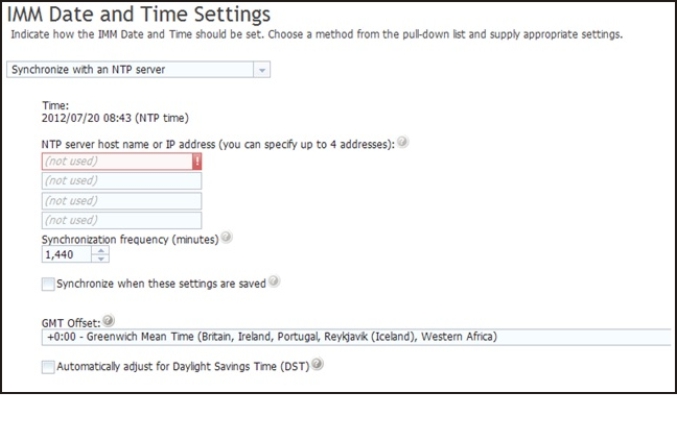
Changing the time and date settings (NTP server mode)
- From the Indicate how the IMM date and time should be set menu list, click Synchronize with an NTP server.
- In the NTP server host name or IP address field, specify the name of the NTP server to be used for clock synchronization.
- In the Synchronization frequency (in minutes) field, specify the approximate interval between synchronization requests. Enter a value between 3 - 1440 minutes.
- Check the Synchronize when these settings are saved check box to request an immediate synchronization (when you click Apply), instead of waiting for the interval time to lapse.
- In the GMT Offset field, select the number that specifies the offset, in hours, from GMT, corresponding to the time zone where the server is located.
- Select or clear the Automatically adjust for Daylight Saving Time (DST) check box to specify whether the IMM2 clock automatically adjusts when the local time changes between standard time and daylight saving time.