
Installing a SAS/SATA 4 Pac HDD option

Use this information to install a SAS/SATA 4 Pac HDD option.

You can install an IBM System x3550 M3 hot-swap SAS/SATA 4 Pac HDD option to add four additional 2.5-inch hot-swap hard disk drives in the server. See Lenovo ServerProven website for a list of supported optional devices. To order a SAS/SATA 4 Pac HDD option, contact your IBM sales representative or IBM reseller.

The SAS/SATA 4 Pac HDD option kit contains the following components:

  • One 2.5-inch hard disk drive backplane (with bracket)
  • Four drive bay filler panels
  • One SAS signal cable
  • One 4 Pac hard disk drive cage and screws
  • One bezel (depending on the option you purchase)

To install a SAS/SATA 4 Pac HDD option, complete the following steps:
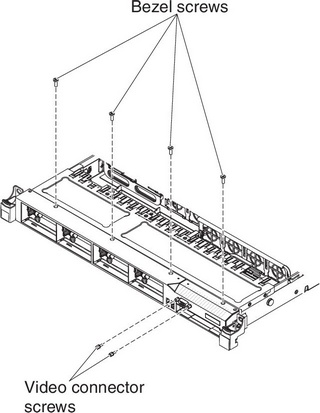
  1. Read the safety information that begins on Safety and Installation guidelines.
  2. Turn off the server and peripheral devices and disconnect the power cords.
  3. Remove the cover (see Removing the cover).
  4. Remove the hard disk drives and filler panels from the hard disk drive bays.
  5. Remove the screws from the bezel.
    Figure 1. Screws removal
    Screws removal
  6. Remove the screws from the video connector.
  7. Pull the top of the bezel out slightly; then, rotate it downward until the tabs on the bottom of the bezel disengages from the chassis and set it aside.
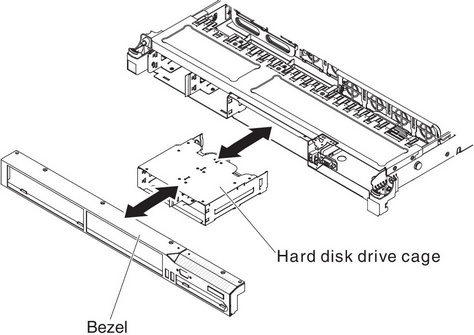
  8. Slide the hot-swap hard disk drive cage forward into the server until the screw holes on the drive cage align with the screw holes on the chassis.
    Figure 2. Hard disk drive cage installation
    Hard disk drive cage installation
  9. Insert the tabs on the bottom of the bezel into the holes on the chassis.
  10. Reinstall the bezel screws and the video connector screws.
  11. Align the sides of the hard disk drive backplane with the slots on the backplane bracket.
  12. Insert the hard disk drive backplane into the slots on the backplane bracket and push the hard disk drive backplane down until the backplane is fully seated.
    Note
    You can reconnect the cables to the hard disk drive backplane before installing the backplane onto the brackets or you can connect the cables after you install the backplane, if that is easier for you.
    Figure 3. Hard disk drive backplane installation
    Hard disk drive backplane installation
  13. Connect the SATA power cable, the SATA signal cable, and the configuration cable to the hard disk drive backplane (see Internal cable routing and connectors).
    Note
    The configuration cable will not be shipped with this option. The configuration cable is already installed from the system board to the original backplane, this cable is two drops chained cable. Connect the end of this cable to the newly-added 4 Pac HDD backplane.
  14. Connect the other end of the SATA signal cable to the connector on the SAS/SATA adapter (see Step 8 in “Installing a ServeRAID SAS/SATA controller on the SAS/SATA RAID riser card”).
  15. Reinstall the hard disk drives and filler panels.

If you have other devices to install or remove, do so now. Otherwise, go to Completing the installation.