Replacing a ServeRAID SAS/SATA controller
Use this information to replace a ServeRAID SAS/SATA controller.
The ServeRAID SAS/SATA controller can be installed in the dedicated connector on the system board or PCI riser-card slots (see System-board internal connectors for the location of the connectors). To install a SAS/SATA adapter, complete the following steps:
Depending on the server model, the server comes with a ServeRAID H1110, a ServeRAID M1115, a ServeRAID M5110, or a ServeRAID 5210 SAS/SATA adapter installed.
Note
Remove the PCI bracket that come with ServeRAID H1110, ServeRAID M1115, ServeRAID M5110 SAS/SATA, or a ServeRAID 5210 adapter before installing a SAS/SATA adapter in the dedicated connector on the system board.
Attention
- You can not install ServeRAID H1110 when microprocessor Intel Xeon E5-2637 (FRU part number 49Y8124) is installed.
- You can not install ServeRAID M1115 or 6Gb performance optimized HBA when Quadro 2000 is installed.
You can replace the ServeRAID controller with another supported ServeRAID controller. For a list of supported ServeRAID controllers, see Lenovo ServerProven website.
Note
For brevity, in this documentation the ServeRAID SAS/SATA controller is often referred to as the SAS/SATA adapter or the ServeRAID adapter.
- Insert the SAS/SATA adapter in the dedicated connector on the system board or PCI riser-card slots.AttentionIncomplete insertion might cause damage to the server or the adapter.
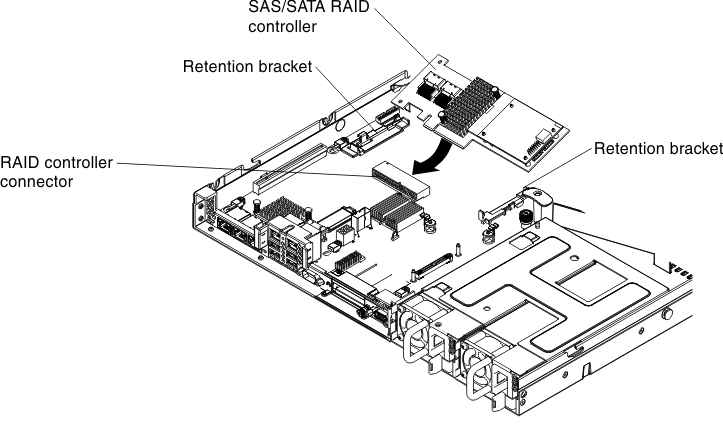
- Insert the SAS/SATA adapter into the RAID connector on the system board until it is firmly seated. The retention brackets secure the SAS/SATA adapter in place when the adapter is firmly seated into the connector. NoteRemove the PCI bracket that come with ServeRAID H1110, ServeRAID M1115, or ServeRAID M5110 SAS/SATA adapter before installing a SAS/SATA adapter in the dedicated connector on the system board.Figure 1. ServeRAID adapter installation
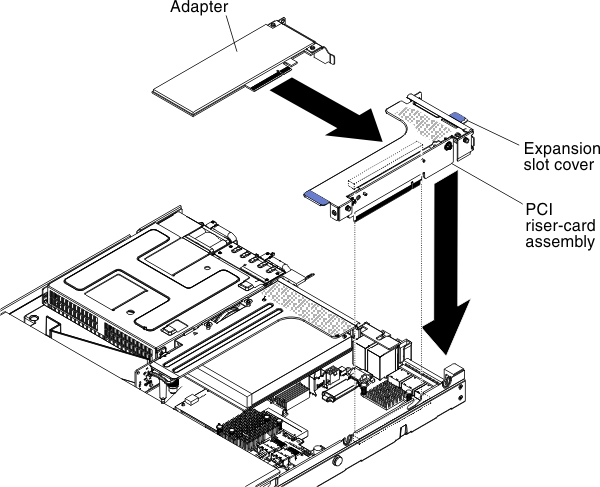
- Insert the SAS/SATA adapter into the PCI riser cards (see Replacing an adapter).Figure 2. Adapter installation
- Insert the SAS/SATA adapter into the RAID connector on the system board until it is firmly seated. The retention brackets secure the SAS/SATA adapter in place when the adapter is firmly seated into the connector.
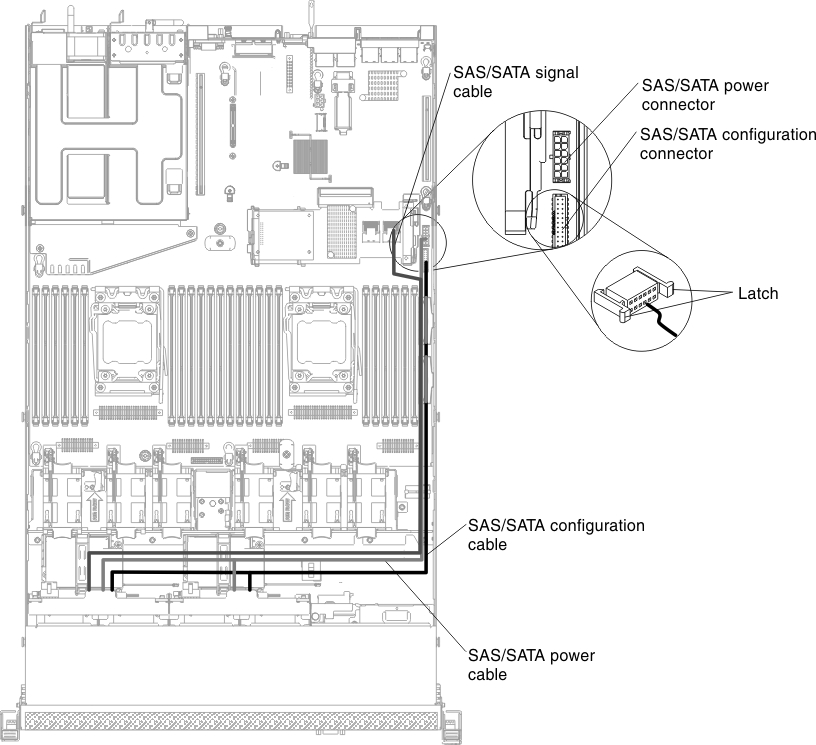
- Route the backplane signal cables (see Cabling backplane).Figure 3. ServeRAID adapter cable routing
- Connect the signal cables to the SAS/SATA adapter:
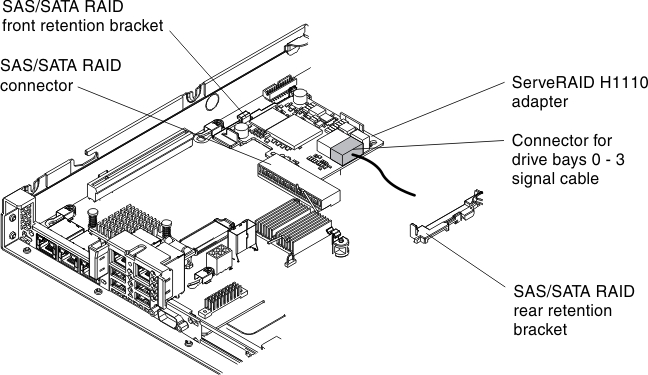
- ServeRAID H1110 adapter: Take the signal cable that is attached to the drive backplane for drive bays 0 through 3 and connect it to the SAS/SATA connector on the ServeRAID adapter.Figure 4. ServeRAID H1110 adapter cable routing
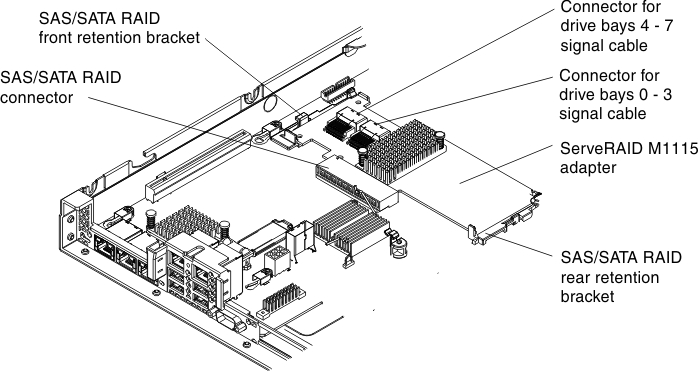
- ServeRAID M1115 adapter: Take the signal cable that is attached to the drive backplane for drive bays 4 through 7 and connect it to the ServeRAID adapter connector for drive bays 4 through 7 (port 1). Connect the other signal cable that is attached to the drive backplane for drive bays 0 through 3 and connect it to the other connector (port 0) on the adapter.Figure 5. ServeRAID M1115 adapter cable routing
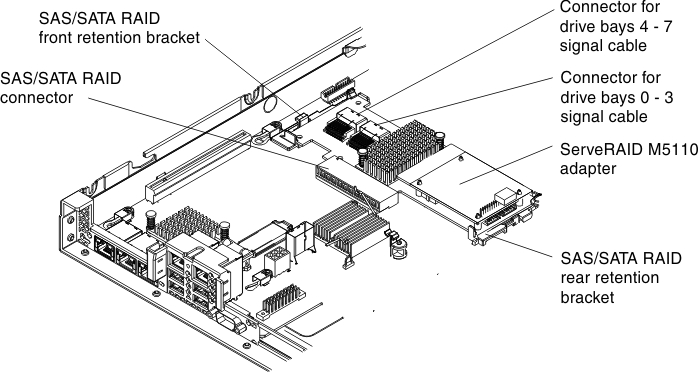
- ServeRAID M5110 adapter: Take the signal cable that is attached to the drive backplane for drive bays 4 through 7 and connect it to the ServeRAID adapter connector for drive bays 4 through 7 (port 1). Connect the other signal cable that is attached to the drive backplane for drive bays 0 through 3 and connect it to the other connector (port 0) on the adapter.Figure 6. ServeRAID M5110 adapter cable routing
- ServeRAID H1110 adapter: Take the signal cable that is attached to the drive backplane for drive bays 0 through 3 and connect it to the SAS/SATA connector on the ServeRAID adapter.
Note
When you restart the server, you are prompted to import the existing RAID configuration to the new ServeRAID adapter.
Give feedback