Replacing an adapter
The following notes describe the types of adapters that the server supports and other information that you must consider when you install an adapter.
- Locate the documentation that comes with the adapter and follow those instructions in addition to the instructions in this section.
- The server provides one internal SAS/SATA RAID connector and two PCI slots on the system board. See System-board optional-device connectors for the location of the internal SAS/SATA RAID connector and riser-card slots. You can replace the ServeRAID SAS/SATA adapter with an optional ServeRAID SAS/SATA adapter in the slot. For configuration information, see the ServeRAID documentation at Lenovo Data Center Support.
- Do not set the maximum digital video adapter resolution above 1600 x 1200 at 75 Hz for an LCD monitor. This is the highest resolution that is supported for any add-on video adapter that you install in the server.
- Read the following table before installing memory modules when any NVIDIA Quadro adapters is installed.
Table 1. NVIDIA Quadro video adapter configurations Description Supported maximum total memory size Quadro 600 adapter 128 GB Quadro 2000 adapter 512 GB - Read the following table before installing NAND flash adapters.
Table 2. Adapter configurations Description Option part number PCI riser 1 PCI riser 2 Emulex dual-port 10GbE SFP+ embedded adapter 00D8540 Six fans installed required1 Six fans installed required1 365 GB High IOPS MLC mono adapter 46C9078 Six fans installed required1 Six fans installed required1 785 GB High IOPS MLC mono adapter 46C9081 Six fans installed required1 Six fans installed required1 1.2 TB high IOPS MLC mono adapter 90Y4377 Six fans installed required1 Six fans installed required1 2.4 TB high IOPS MLC duo adapter 90Y4397 Not supported Six fans installed required1 Flash Adapter F825 Enterprise Value 00AE861 Six fans installed required1 Six fans installed required1 Flash Adapter F1650 Enterprise Value 00AE864 Six fans installed required1 Six fans installed required1 300GB High IOPS MLC modular adapter 90Y4361 Six fans installed required1 Six fans installed required1 600GB High IOPS MLC modular adapter 90Y4365 Six fans installed required1 Six fans installed required1 800GB High IOPS MLC modular adapter 90Y4369 Six fans installed required1 Six fans installed required1 Flash Adapter F3200 Enterprise Value 00AE867 Not supported Six fans installed required1 Qlogic 8200 dual-port 10GbE SFP+ VFA 90Y4600 Six fans installed required1 Six fans installed required1 ServeRAID M5120 SAS/SATA controller 81Y4478 Six fans installed required1 Six fans installed required1 ServeRAID M5225 SAS/SATA controller 00AE938 Not supported Four fans installed required Solarflare SFN5162F midrange dual-port 10GbE SFP+ adapter 47C9952 Six fans installed required1 Six fans installed required1 Solarflare SFN6122F low latency dual-port 10GbE SFP+ adapter 47C9960 Six fans installed required1 Six fans installed required1 Solarflare SFN7122F 2x10GbE SFP+ flareon ultra adapter for System x 47C9977 Six fans installed required1 Six fans installed required1 Table note- You can purchase Lenovo System x3550 M4 Thermal Solution Kit (option part number 00Y7117) to acquire two additional fans for your server.
- Any high-definition video-out connector or stereo connector on any add-on video adapter is not supported
- The server does not support full-length, full-height PCI adapters or legacy 5V PCI adapters.
- When you install any PCI adapter, the power cords must be disconnected from the power source before you remove the PCI Express riser-card assembly and the PCI-X riser-card assembly. Otherwise, the active power management event signal will be disabled by the system-board logic, and the Wake on LAN feature might not work. However, after the server is powered-on locally, the active power manager active power management event signal will be enabled by the system-board logic.
- The server provides two PCI riser-card slots on the system board. The following information indicates the riser-card slots and the type of adapters that the riser cards support:
- If you want to install a PCI Express or PCI-X adapter, you must order the PCI riser-card option.
- PCI riser slot 1. This slot supports only low-profile adapters.
- PCI riser slot 2. This slot supports full-height, half-length adapters.
The following table lists the supported configurations for the PCI riser-card slots.Table 3. PCI riser slots supported configurations PCI riser-card slot number Configuration 1 Configuration 2 (Two microprocessors installed) Configuration 3 Slot 1 PCI Express 3.0 (x16) card with a PCI Express riser card with a standard bracket PCI Express 3.0 (x16) card with a PCI Express riser card with a standard bracket PCI Express 3.0 (x16) card with a PCI Express riser card with a standard bracket Slot 2 PCI Express 3.0 (x8) card with a PCI Express riser card with a standard bracket PCI Express 3.0 (x16) card with a PCI Express riser card with a standard bracket PCI-X 64-bit/133 MHz card with a PCI-X riser card with a standard bracket
Note
- The instructions in this section apply to any PCI adapter (for example, video graphics adapters or network adapters).
- Do not set the maximum digital video adapter resolution above 1600 x 1200 at 75 Hz for an LCD monitor. This is the highest resolution that is supported for any add-on video adapter that you install in the server.
- Any high-definition video-out connector or stereo connector on any add-on video adapter is not supported.
If your adapter was previously configured, backup or record its configuration information, if possible, before replacing the adapter. See the documentation for your adapter for information and instructions.
If you are replacing a ServeRAID adapter, import your RAID configuration to the replacement adapter as a foreign configuration after you finish the replacement. See the ServeRAID-M Software User Guide for instructions.
To install an adapter, complete the following steps:
- Insert the adapter into the PCI riser-card assembly, aligning the edge connector on the adapter with the connector on the PCI riser-card assembly. Press the edge of the connector firmly into the PCI riser-card assembly. Make sure that the adapter snaps into the PCI riser-card assembly securely. Figure 1. Adapter installation
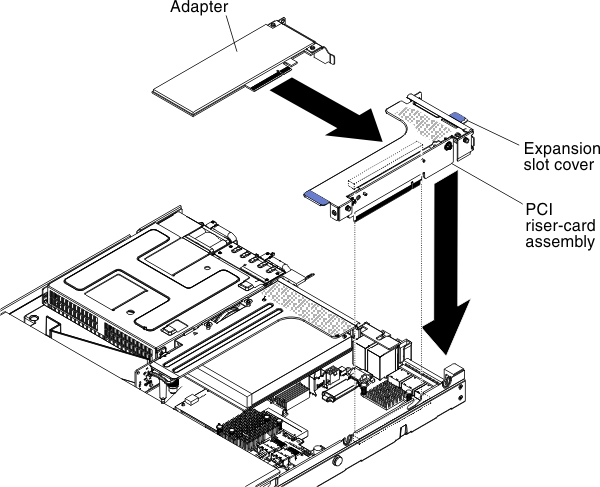 AttentionWhen you install an adapter, make sure that the adapter is correctly seated in the riser-card assembly and that the riser-card assembly is securely seated in the riser-card connector on the system board before you turn on the server. An incorrectly seated adapter might cause damage to the system board, the riser-card assembly, or the adapter.
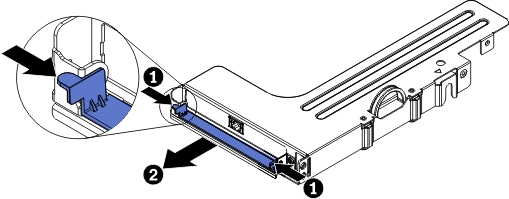
 - Connect the cable to the newly-installed adapter.NoteYou might need to remove the blue latch from PCI riser-card assembly 2 to easily connect the cables.Figure 2. Latch removal
Give feedback