Replacing a SAS/SATA HDD option
Use this information to replace a SAS/SATA HDD.
Note
You must turn off the server before replacing a SAS/SATA 8 Pac HDD option.
To remove a SAS/SATA 8 Pac HDD option, complete the following steps:
- Read the safety information that begins in Safety and Installation guidelines.
- Turn off the server and peripheral devices, and disconnect the power cords and all external cables.
- Remove the bezel (see Removing the bezel).
- Remove the left-side cover (see Removing the left-side cover).
- Pull the hard disk drives and filler panels out of the server slightly to disengage them from the hard disk drive backplane.
- Remove the 2.5-inch hot-swap SAS/SATA hard disk drive backplane (see Replacing a 2.5-inch disk drive backplane).
You can install an Lenovo System x3300 M4 Hot-swap SAS/SATA 8 Pac HDD option in the server. See the Lenovo ServerProven website for a list of supported optional devices. To order a SAS/SATA 8 Pac HDD option, contact your Lenovo marketing representative or authorized reseller.
To install a SAS/SATA 8 Pac HDD option, complete the following steps:
- Read the safety information that begins in Safety and Installation guidelines.
- Turn off the server and peripheral devices, and disconnect the power cords and all external cables.
- Remove the bezel (see Removing the bezel.
- Remove the left-side cover (see Removing the left-side cover.
- Remove the fillers if necessary.
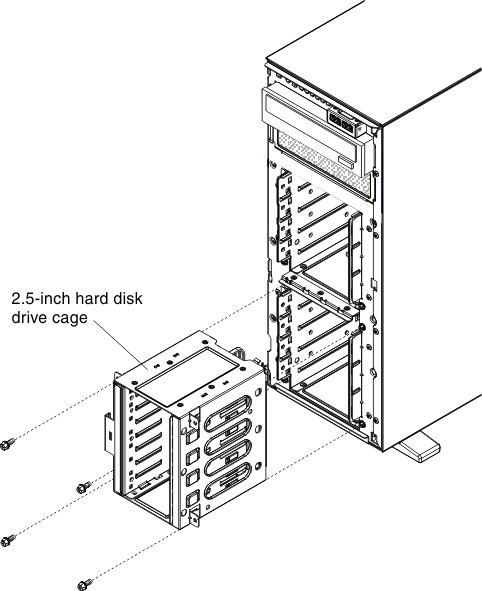
- Install the 2.5-inch hard disk drive cage if necessary.NoteIf you are upgrading the hard disk drive bays from 16 to 24 and the 2.5-inch hard disk drive cage is already installed. Keep the new 2.5-inch hard disk drive cage comes with the option in a safe place for potential future use.
- Align the 2.5-inch hard disk drive cage with the chassis and install it in the server.

- Fasten the four screws.
- Align the 2.5-inch hard disk drive cage with the chassis and install it in the server.
- Install the 2.5-inch hot-swap hard disk drive backplane (see Replacing a 2.5-inch disk drive backplane).
- Install the EMC shields that come with the option.
- Install the 2.5-inch hard disk drives (see Installing a 2.5-inch hot-swap hard disk drive).
- Install the drive bay filler panels that come with the option into empty drive bays.
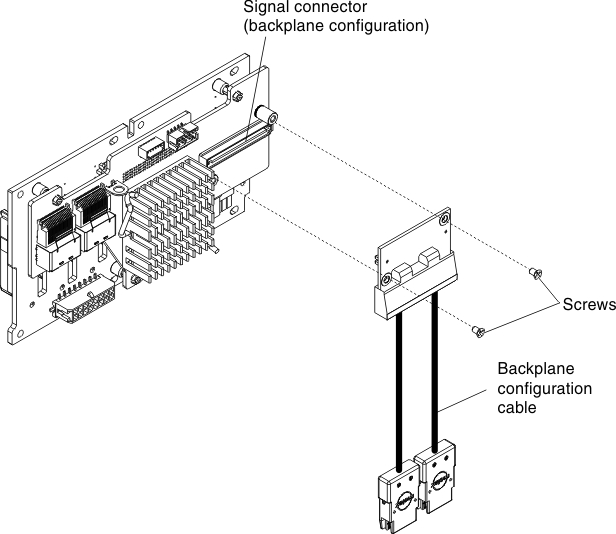
- Connect the backplane configuration cable, power cable, signal cable, and the configuration cable (see Internal Cable Routing and Connectors).NoteYou may need to install the two screws on the backplane configuration cable.

- Reinstall the bezel (see Removing the bezel).
- Reinstall the left-side cover (see Removing the left-side cover).
- Reconnect the power cords and any cables that you removed.
- Turn on the peripheral devices and the server.
Give feedback