Use this information to replace the fixed power supply.
When you remove or install the fixed power supply, observe the following precautions.
Statement 8
Never remove the cover on a power supply or any part that has the following label attached.

Hazardous voltage, current, and energy levels are present inside any component that has this label attached. There are no serviceable parts inside these components. If you suspect a with one of these parts, contact a service technician.
Read the safety information in Safety and Installation guidelines.
If you are replacing a server component in the server, you need to turn off the server and peripheral devices, and disconnect the power cords and all external cables.
To replace the fixed power supply, complete the following steps.
- Place the new power supply into the bay.
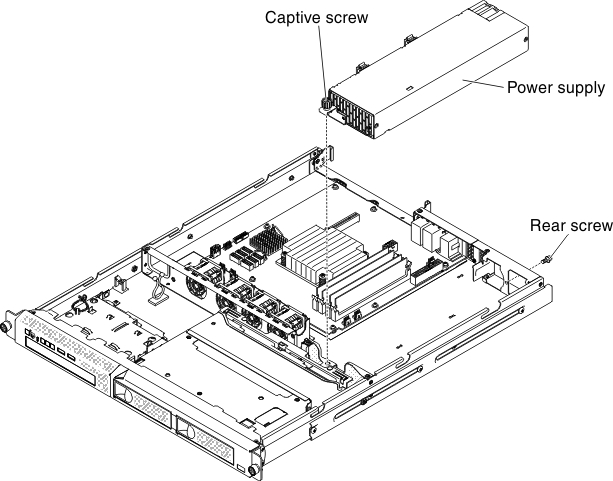
- Tighten the captive thumbscrew that secures the rear of the power supply to the chassis bottom.
- Replace the screw that holds the power supply to the rear of the chassis.
- Connect the internal power-supply cable from the power supply to the power connectors on the system board. See “System-board internal connectors” for the locations of the power connectors on the system board.
- Route the internal power-supply cables, securing them with the retention-clips.
- Test the power supply:
- Connect one end of the ac power cord for the new power supply into the connector on the back of the power supply, and connect the other end of the power cord into a properly grounded electrical outlet.
- Make sure that the standby power LED on the system board is lit (see “System-board LEDs”); if the standby power LED is not lit, discontinue this procedure and obtain a new power supply.
- Press the power-control button. Make sure that the power-on LED on the front of the server is lit.
If the server starts, proceed to the next step. If the server does not start, disconnect the ac power cord and call for service.
- Turn off the server and disconnect the ac power cord.
- Connect the cables from the power supply to the internal devices.
- Install the hard disk drive backplane or backplate assembly (see Replacing the simple-swap hard disk drive backplate assembly or Replacing the hot-swap hard disk drive backplane).
- Reinstall the cover (see Replacing the cover).
- Reconnect the ac power cord into the connector on the back of the power supply.
- Connect all external cables that you disconnected in "Removing the fixed power supply".
- Connect the other end of the ac power cord into a properly grounded electrical outlet.
- Press the power-control button.
- Make sure that the power-on LED on the front of the server is lit.
If you have replaced a server component or installed an optional device in the server, you need to reconnect the power cords and all external cables, and turn on the server and peripheral devices.