Installing an adapter
Use this information to install an adapter.
The following notes describe the types of adapters that the server supports and other information that you must consider when you install an adapter:
- To confirm that the server supports the adapter that you are installing, see the Lenovo ServerProven website.
- Locate the documentation that comes with the adapter and follow those instructions in addition to the instructions in this section.
- The adapter slots are on the PCI riser-card assembly. You must first remove the PCI riser-card assembly to access the adapter slots.
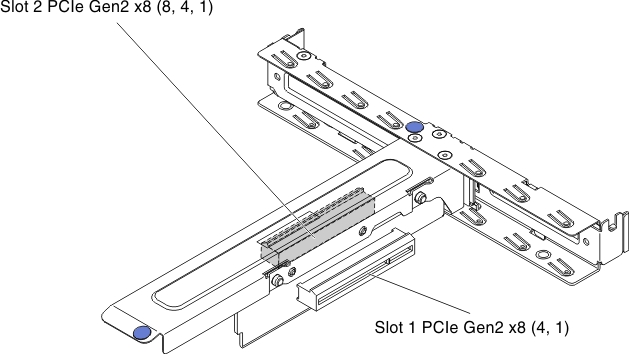
- The expansion slots on the PCI riser-card assembly accommodate the various form factors of the non-hot-plug adapters as follows:
- Expansion slot 1: Low-profile with 2U bracket (this slot is dedicated for ServeRAID-10il v2 SAS/SATA controller)
- Expansion slot 2: Full-height, half-lengthFigure 1. PCI riser-card assembly
- The optional ServeRAID-BR10il v2 controller must be installed in expansion slot 1 on the PCI riser-card assembly.
Read the safety information in Safety and Installation guidelines.
If you are installing an optional device in the server, turn off the server and peripheral devices, and disconnect the power cords and all external cables.
To install an adapter, complete the following steps.
- Align the connector on the adapter with the connector on the PCI riser-card assembly, then, insert the adapter into the PCI riser-card assembly. Press the edge of the connector firmly into the PCI riser-card assembly. Make sure that the adapter is securely installed in the PCI riser-card assembly.ImportantMake sure that the U-shaped opening in the metal adapter bracket engages the tab on the expansion-slot bracket.Figure 2. Adapter installation

If you have other devices to install, do so now. Otherwise, go to Completing the installation.
Note
If the server is configured for RAID operation through an optional ServeRAID adapter, you might have to reconfigure your disk arrays after you install an adapter. See the ServeRAID documentation on the IBM ServerRAID Support CD for additional information about RAID operation and complete instructions for using ServeRAID Manager.
Give feedback