When connecting SAS cables between enclosures, you must
follow a list of guidelines to ensure that your configuration is valid.
Orienting the connector
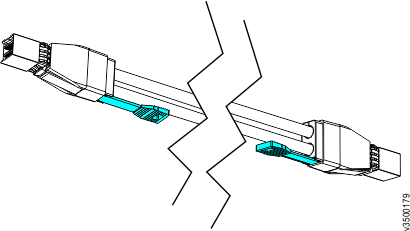
When inserting SAS cables, make sure the connector (Figure 1) is oriented correctly.
- The orientation of the connector must match the orientation
of the port before you push the connector into the port. The cable
connector and socket are keyed, and it is important that you have
proper alignment of the keys when the cable is inserted.
- The blue pull tab must be below the connector.
- Insert the connector gently until it clicks into place.
If you feel resistance, the connector is probably oriented the wrong
way. Do not force it.
- When inserted correctly, the connector can only be removed by
pulling the tab.
- When both ends of a SAS cable are inserted correctly,
the green link LEDs next to the connected SAS ports are lit.
Figure 1. SAS cable connectors
Guidelines
Be aware of the following guidelines when you
attach the cables to the SAS ports.
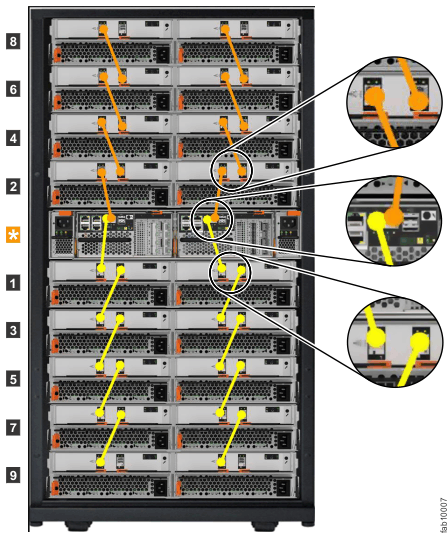
- No more than ten expansion enclosures can be chained to SAS port
1 of a node canister. The expansion enclosures in this chain should
be installed below the control enclosure (as shown in Figure 2).
- No more than ten expansion enclosures can be chained to SAS port
2 of a node canister. The expansion enclosures in this chain should
be installed above the control enclosure (as shown in Figure 2).
- No cable can be connected between a port on a left canister and
a port on a right canister.
- A cable must not be connected between ports in the
same enclosure.
- A connected port on the node canister must connect
to a single port on an expansion canister. Cables that split the connector
out into separate physical connections are not supported.
- Attach cables serially between enclosures; do not skip an enclosure.
- The last enclosure in a chain must not have cables in port 2 of
canister 1 and port 2 of canister 2.
- Ensure that cables are installed in
an orderly way to reduce the risk of cable damage when replaceable
units are removed or inserted.
Figure 2. Connecting the SAS cables


