You must connect a mini-SAS HD to mini-SAS HD cable to each canister.
SAS cables are available in various lengths. Ensure that each cable is long enough to reach
the previous enclosure added to the system while being kept tidy. When two cables are installed,
they go between the same two enclosures.
Note: When you insert a SAS cable, make sure that the
connector is oriented correctly.
- The pull tab must be below the connector.
- Insert the connector gently until it clicks into place. If you feel resistance, the connector is probably oriented the wrong way. Do not force it.
- When inserted correctly, the connector can only be removed by pulling the tab.
- To connect the first expansion enclosure to a system, complete
the following steps.
- Connect the other end to SAS port 1 (with an up arrow)
on the expansion canister in the expansion enclosure.Note: Always connect the node canister to the expansion canister on the same side (left to left, right to right) as shown in Connecting the SAS cables.Figure 1. Connecting the SAS cables
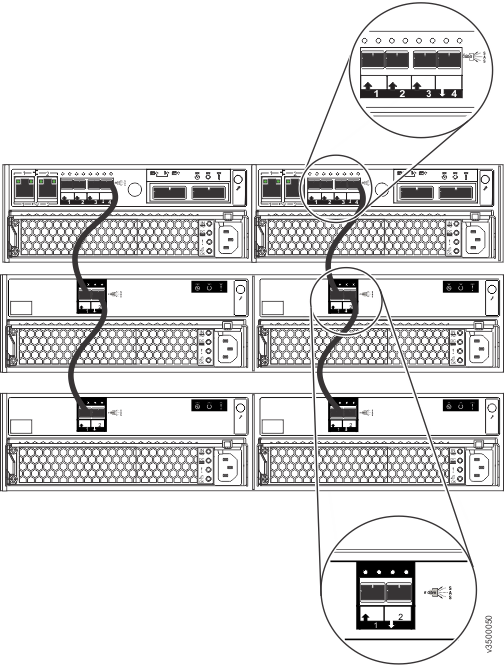
- Connect the other end to SAS port 1 (with an up arrow)
on the expansion canister in the expansion enclosure.
- To connect an additional expansion enclosure to a system
that already has a least one expansion enclosure, complete the following
steps.
If both enclosures connected by a SAS cable are powered, you can check the status LEDs
above the ports where the cable is connected (SAS port status LEDs).
Figure 2. SAS port status LEDs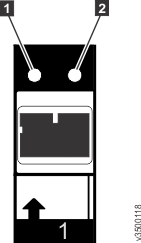
- 1 SAS link LED
- 2 SAS fault LED
- The SAS link LED should be ON.
- The SAS fault LED should be OFF.