Use this information to add a pair of host interface adapters to a system that is shut down.
Complete the following instructions to add a pair of host interface adapters to a system that is shut down.
- In the management GUI, check the recommended actions event
log view.
Resolve any issues that exist before continuing.
- Power the system down.
For information, refer to Procedure: Powering off your system.
- Complete the following steps for each canister in the control
enclosure.
- Noting their position, remove cables that are attached to the node canister
- Remove the canister from the enclosure by opening the release handles and pulling the canister fully out. Refer to Procedure: Removing a node canister for details.
- Remove the lid from the canister.
For instructions, refer to Procedure: Removing and replacing lid of a node canister.
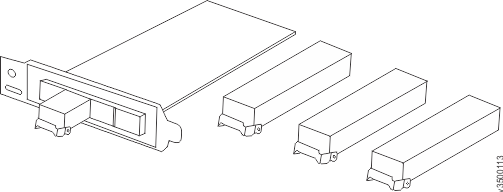
- If the host interface adapter has SFP transceivers, remove them.
To remove a transceiver, swing the release handle open and use it to pull the transceiver out of the host interface adapter port (Host interface adapter and SFP transceivers).Figure 1. Host interface adapter and SFP transceivers

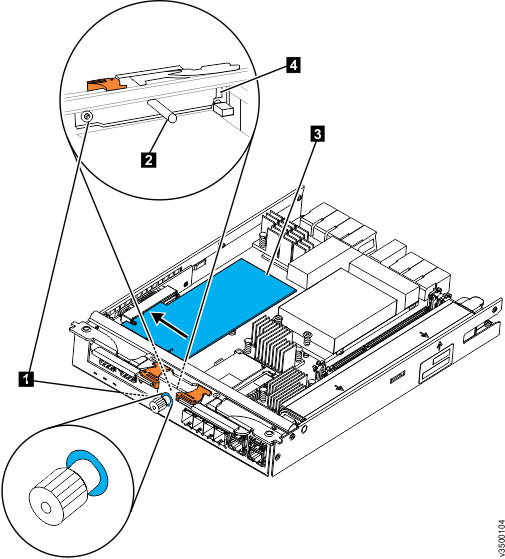
- Loosen the retaining thumbscrew 1 as shown
in Installing host interface adapter.
Figure 2. Installing host interface adapter

- 1 Retaining thumbscrew
- 2 Filler handle
- 3Host interface adapter
- 4 Catch slot
- From inside the canister, grasp the filler handle 2 and slide the filler plate toward the thumbscrew to disengage the plate from the catch slot 4.
- Remove the filler plate.
- Insert the host interface adapter3 into the canister, as shown in Installing host interface adapter.
- Align the mounting bracket of the host interface adapter with the inside of the host interface adapter aperture at the thumbscrew end of the canister. Ensure the tab at the end of the faceplate is aligned with the catch slot 4.
- Align the connecting edge of the host interface adapter with the slot in the host interface adapter connector inside the canister.
- Apply pressure to the opposite edge of the host interface adapter to push the adapter into the connector.
- Check that the host interface adapter is installed squarely in its slot and tighten the retaining thumbscrew 1.
- Reinstall the lid on the canister.
- If you removed SFP transceivers in step 3.d, reinstall them.
To install a transceiver, push it fully into the port and close the release handle.
- If you purchased an additional 2-transceiver option,
install the extra SFP transceivers in the remaining ports.
You can install one or two extra transceivers in the canister. You must install the same number in both canisters in the enclosure.
- Reinstall the canister in the enclosure, replace any cables that were removed, and install the cables that will connect the host interface adapter to host systems.
- Power the system on.
Note: Do not start host applications yet.The canister restarts. Because the hardware configuration has changed, a node error (841) and associated alert (1199) are recorded in the system event log for each node canister.
- Use the Recommended Action in the management GUI monitoring
page to check and accept the hardware changes reported by alert 1199.
The node canisters restart as part of this process. Alert 1470, indicating that the node canister hardware does not match, might be seen temporarily. You can ignore this alert.
The hardware installation is complete. Any host applications that were stopped before powering off the system can be restarted now.
The host interface adapters are now installed and ready for use.
- If you have connected to a Fibre Channel SAN Network, zone your network to include your Storwize system. When your hosts are configured, you will need to use the operations available in the management GUI Hosts tab to configure their use.
- Check for any new alerts in the event log. Resolve them using the recommended actions.