Replacing an adapter
The following notes describe the types of adapters that the server supports and other information that you must consider when you install an adapter.
Note
- The instructions in this section apply to any supported adapter (for example, video graphics adapters or network adapters).
- See Installing an adapter for additional notes and information that you must consider when you install an adapter in the server.
- Do not set the maximum digital video adapter resolution above 1600 x 1200 at 75 Hz for an LCD monitor. This is the highest resolution that is supported for any add-on video adapter that you install in the server.
- Any high-definition video-out connector or stereo connector on any add-on video adapter is not supported
To replace an adapter, complete the following steps:
Attention
When you install an adapter, make sure that the adapter is correctly seated in the PCI riser-card assembly and that the PCI riser-card assembly is securely seated in the riser-card connector on the system board before you turn on the server. An incorrectly seated adapter might cause damage to the system board, the PCI riser-card assembly, or the adapter.
Note
If your adapter was previously configured, back up or record its configuration information, if possible, before replacing the adapter. See the documentation for your adapter for information and instructions.
- Installing an adapter in PCI riser-card assembly 1:
Insert the adapter into the PCI riser-card assembly, aligning the edge connector on the adapter with the connector on the PCI riser-card assembly. Press the edge of the connector firmly into the PCI riser-card assembly. Make sure that the adapter snaps into the riser-card assembly securely.
Figure 1. Adapter removal to PCI riser-card assembly 1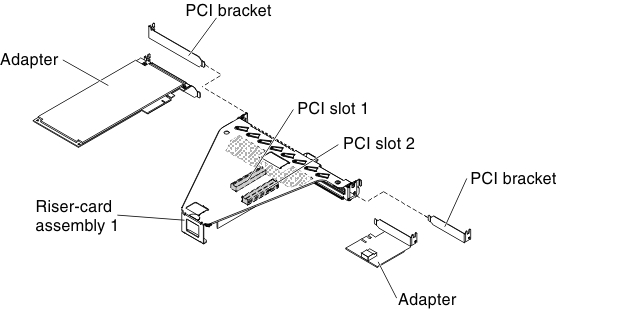
- Installing a ServeRAID adapter in PCI riser-card assembly 2:
- Insert the adapter into the riser-card assembly, aligning the edge connector on the adapter with the connector on the riser-card assembly. Press the edge of the connector firmly into the riser-card assembly. Make sure that the adapter snaps into the riser-card assembly securely.
- Rotate the retention latch to the close position. Make sure the retention latch engages the adapter securely; then, push in the release pin to lock the retention latch in place.
Figure 2. Adapter installation to PCI riser-card assembly 2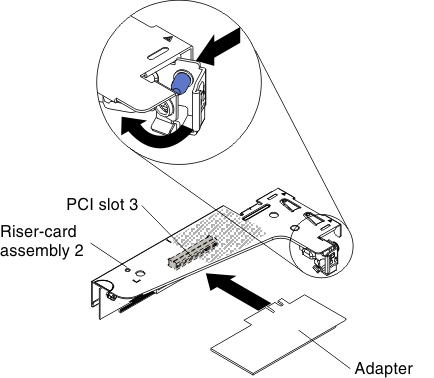
Give feedback