Replacing the standard I/O book
Use this information for instructions on how to replace the standard I/O book.
- If you are installing external RAID adapters that comes with a flash power module, the adapters must be installed in PCIe slots 7, 8, and 9 in the standard I/O book. Install the adapter flash power modules in the slots in the air baffle in the standard I/O book. Other PCIe adapters that do not come with a flash power module can also be installed in the standard I/O book.
- You can install up to three flash power modules in the standard I/O book.
- You can install only ML2 Ethernet adapters in PCIe slot 10 of the standard I/O book. See Supported ML2 (Ethernet) adapters for more information about the Ethernet adapters.
- When you replace the standard I/O book , you must either update the standard I/O book board with the latest firmware or restore the pre-existing firmware image that the customer provides. Make sure that you have the latest firmware or a copy of the pre-existing firmware before you proceed. See Updating the firmware and Updating the Universal Unique Identifier and DMI/SMBIOS data for more information.AttentionInstalling the wrong firmware or device-driver update might cause the server to malfunction. Before you install a firmware or device-driver update, read any readme and change history files that are provided with the downloaded update. These files contain important information about the update and the procedure for installing the update, including any special procedure for updating from an early firmware or device-driver version to the latest version.
Make sure that you update the system and component Vital Product Data (VPD) as described in this topic.
Make sure that you restore system configuration as described in this topic.
- Reactivate any Features on Demand features. Instructions for automating the activation of features and installing activation keys is in the System x Features on Demand User’s Guide. To download the document, go to the Lenovo Features on Demand website, log in, and click Help.
- For more information, see Standard I/O book.
To replace the standard I/O book, complete the following steps:
- Touch the static-protective package that contains the new module to any unpainted surface on the outside of the server; then, grasp the standard I/O book and remove it from the package.
- Install the flash power modules (see Replacing a RAID adapter flash power module in the standard I/O book).
- Install the USB embedded hypervisor flash device (see Replacing a USB embedded hypervisor flash device).
- Install the adapters (see Replacing an adapter).
- Cable the adapters.
- Close the adapter retention lever.
- Install the fans (see Replacing a hot-swap fan assembly).
- Grasp the standard I/O book and align it with the slot on the server and slide it into the chassis shuttle.
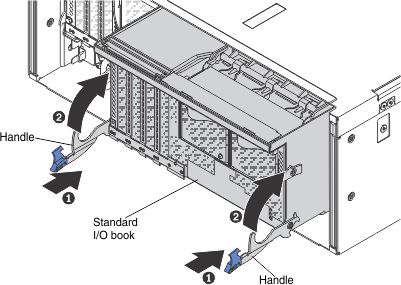
- Rotate the handles all the way up until they are locked in place.
- Reconnect the power cord and any cables that you removed.
- Turn on the peripheral devices and the server.
- Restore the system configuration information, IMM network settings, Features on Demand (FoD) keys, system machine type, system model number, system serial number, system Universal Unique Identifier (UUID) and system asset tag of the server using the Advanced Settings Utility (ASU) program. For more information about using ASU and additional command options, see Advanced Settings Utility program.
Restore system configuration information and IMM network settings
Use the following ASU command to restore system configuration information and IMM network settings:
asu64 restore <system_config>where:
<system_config> is the complete path name of the file where the system configuration is located.
Also, restore the original IMM network settings.
Restore the FoD keys
Use the following ASU command to restore the FoD keys:
asu64 fodcfg installkey
Update the system machine type and model number VPD
Use the following ASU command to update the system machine type and model number VPD:
asu64 set SYSTEM_PROD_DATA.SysInfoProdName <machine_type_model>where:
<machine_type_model> is the 7–character system machine type and model number.
Update the system product identifier VPD
Use the following ASU command to update the system product identifier VPD:
asu64 set SYSTEM_PROD_DATA.SysInfoProdIdentifierEx “<product_id>” –overridewhere:
“<product_id>” is “Lenovo System x3850 X6” for 4-socket systems and “Lenovo System x3950 X6” for 8-socket systems.
Update the system serial number VPD
Use the following ASU command to update the system serial number VPD:
asu64 set SYSTEM_PROD_DATA.SysInfoSerialNum <serial_number>where:
“<serial_number>” is the 7–character system product serial number.
Update the system UUID VPD
Use the following ASU command to update the system UUID VPD:
asu64 set SYSTEM_PROD_DATA.SysInfoUUID <uuid>where:
<uuid> is the 16–character hexadecimal field for the system UUID.
NoteContact the customer to determine if the original UUID value should be used.Update the system asset tag VPD
Use the following ASU command to update the system asset tag VPD:
aAsu64 set SYSTEM_PROD_DATA.SysEncloseAssetTag <asset_tag>where:
<asset_tag> is the 33–character system asset tag number.
- Update the front operator panel assembly part number and FRU part number in the customer records, service offering support information and component Vital Product Data (VPD) using the Advanced Settings Utility (ASU) program. For more information about using ASU and additional command options, see Advanced Settings Utility program.
Update the component part number VPD
Use the following ASU command to update the component part number VPD:
asu64 set VPD.CompVPD_PartNumber.3 “<p/n>[sp][sp][sp][sp][sp]”where:
<p/n> is the 7–character component part number above followed by five padding spaces.
Update the FRU part number VPD
Use the following ASU command to update the FRU part number VPD:
asu64 set VPD.CompVPD_FRUNumber.3 “<fru_number>[sp][sp][sp][sp][sp]”where:
<fru_number> is the 7–character FRU part number above followed by five padding spaces.
- Update the LCD system information display panel part number, FRU part number, serial number and prefix serial number in the customer records, service offering support information and component Vital Product Data (VPD) using the Advanced Settings Utility (ASU) program. For more information about using ASU and additional command options, see Advanced Settings Utility program.
Update the component part number VPD
Use the following ASU command to update the component part number VPD:
asu64 set VPD.CompVPD_PartNumber.4 “<p/n>[sp][sp][sp][sp][sp]”where:
<p/n> is the 7–character component part number above followed by five padding spaces.
Update the component serial number and prefix serial number VPD
Use the following ASU commands to update the component serial number and prefix serial number VPD:
asu64 set VPD.CompVPD_SerialNumber.4 <s/n>
asu64 set VPD.CompVPD_PrefixSerialNumber.4 <prefix_s/n>
where:
<s/n> is the 6–character component serial number.
<prefix_s/n> is the 6–character component prefix serial number.
Update the FRU part number VPD
Use the following ASU command to update the FRU part number VPD:
asu64 set VPD.CompVPD_FRUNumber.4 “<fru_number>[sp][sp][sp][sp][sp]”where:
<fru_number> is the 7–character FRU part number above followed by five padding spaces.
- Update the midplane part number, FRU part number, serial number and prefix serial number in the customer records, service offering support information and component Vital Product Data (VPD) using the Advanced Settings Utility (ASU) program. For more information about using ASU and additional command options, see Advanced Settings Utility program.
Update the component part number VPD
Use the following ASU command to update the component part number VPD:
asu64 set VPD.CompVPD_PartNumber.#“<p/n>[sp][sp][sp][sp][sp]”where:
# is 1 for 4-socket midplane and 2 for 8-socket midplane.
<p/n> is the 7–character component part number above followed by five padding spaces.
Update the component serial number and prefix serial number VPD
Use the following ASU commands to update the component serial number and prefix serial number VPD:
asu64 set VPD.CompVPD_SerialNumber.# <s/n>
asu64 set VPD.CompVPD_PrefixSerialNumber.# <prefix_s/n>
where:
# is 1 for 4-socket midplane and 2 for 8-socket midplane.
<s/n> is the 6–character component serial number.
<prefix_s/n> is the 6–character component prefix serial number.
Update the FRU part number VPD
Use the following ASU command to update the FRU part number VPD:
asu64 set VPD.CompVPD_FRUNumber.# “<fru_number>[sp][sp][sp][sp][sp]”where:
# is 1 for 4-socket midplane and 2 for 8-socket midplane.
<fru_number> is the 7–character FRU part number above followed by five padding spaces.
- Update the standard I/O book board with the latest firmware or restore the pre-existing firmware image that the customer provides. See Updating the firmware.AttentionInstalling the wrong firmware or device-driver update might cause the server to malfunction. Before you install a firmware or device-driver update, read any readme and change history files that are provided with the downloaded update. These files contain important information about the update and the procedure for installing the update, including any special procedure for updating from an early firmware or device-driver version to the latest version.
- Restart the IMM2; then, restart the server.