
Installing the 2.5-inch hot-swap hard disk drive backplane (4 to 8 hard disk drive upgrade)

Use this information to install the 2.5-inch hot-swap hard disk drive backplane (4 to 8 hard disk drive upgrade).

Read the safety information in Safety and Installation guidelines.

If you are installing an optional device in the server, you need to slide the server out from the rack enclosure, turn off the server and peripheral devices, and disconnect the power cords and all external cables.

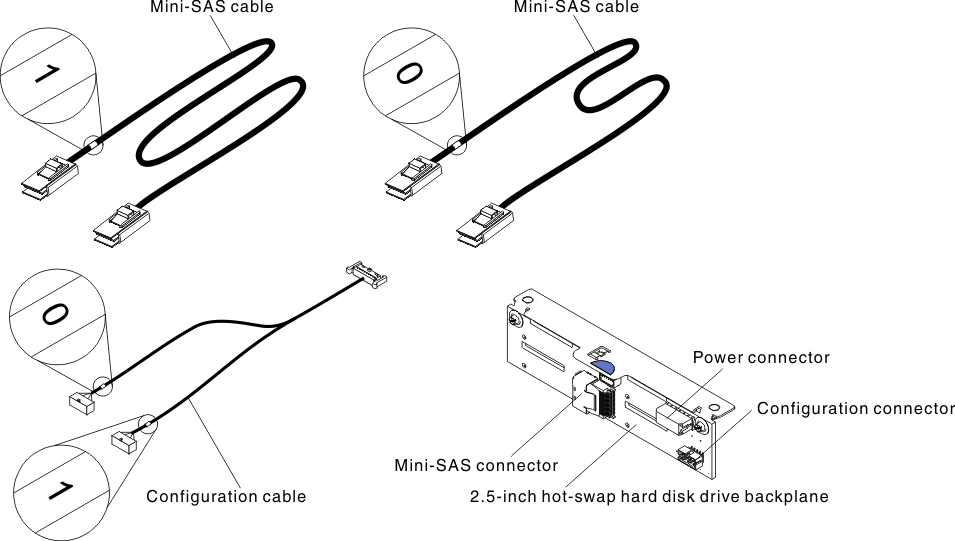
The following diagram shows the 2.5-inch hot-swap hard disk drive four to eight upgrade kit contents:
Figure 1. 2.5-inch hot-swap hard disk drive four to eight upgrade kit contents
2.5-inch hot-swap hard disk drive four to eight upgrade kit contents

To install the 2.5-inch hot-swap hard disk drive backplane (4 to 8 hard disk drive upgrade), complete the following steps:

  1. Remove the cover (see Removing the cover).
  2. Remove the PCI riser-card assembly if applicable (see Removing the PCI riser-card assembly).
  3. Disconnect and remove the existing configuration cable from the system board and the hard disk drive backplane 0. Keep the cable for future use.
  4. Connect the power cable from the power paddle card, Y-shaped configuration cable (labeled "1"), and mini-SAS cable (labeled "1") to the connectors on hard disk drive backplane 1. Connect the other end of the of the mini-SAS cable (labeled "1") to the hardware RAID card port 1.
  5. Connect the Y-shaped configuration cable (labeled "0") and mini-SAS cable (labeled "0") to the connectors on the hard disk drive backplane 0. Connect the other end of the of the mini-SAS cable (labeled "0") to the hardware RAID card port 0. Connect the other end of the Y-shaped configuration cable to the system board.
  6. Align the backplane with the backplane alignment slots in the chassis.
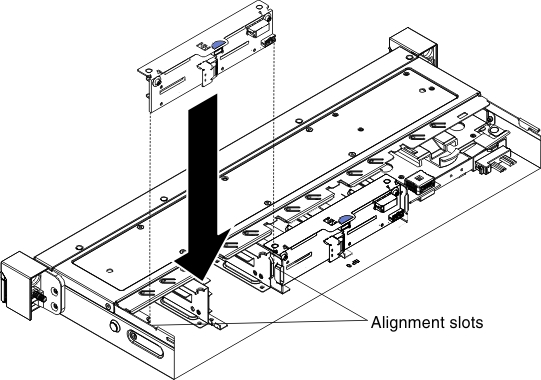
  7. Lower the backplane into the slot in the chassis until the front tab clicks into the latches on the chassis.
    Figure 2. 2.5-inch hot-swap 4 to 8 hard disk drive upgrade backplane installation
    2.5-inch hot-swap 4 to 8 hard disk drive upgrade backplane installation
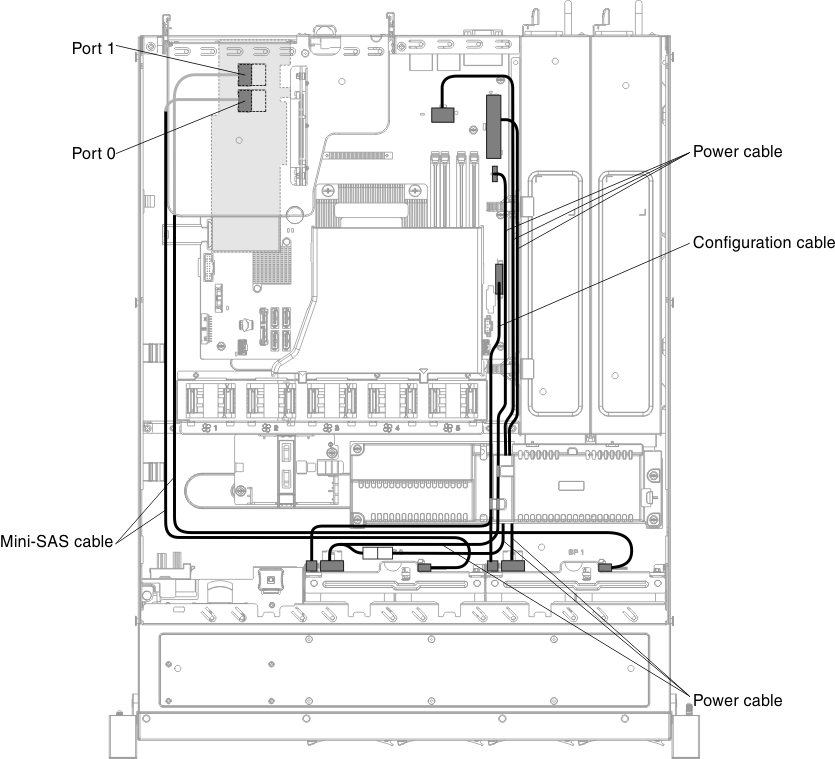
  8. Install the Lenovo ServeRAID SAS/SATA controller (see Installing an Lenovo ServeRAID SAS/SATA controller) before connecting the cables to the hardware RAID card.
    Figure 3. Eight 2.5-inch hot-swap hard disk drives with ServeRAID SAS/SATA controller cable connection (hardware RAID card inserted on the left side)
    Eight 2.5-inch hot-swap hard disk drives with ServeRAID SAS/SATA controller cable connection (hardware RAID card inserted on the left side)
  9. Make sure the relevant cables pass through the cable clips.
  10. Reinstall the PCI riser-card assembly if applicable (see Replacing the PCI riser-card assembly).

If you have other devices to install, do so now. Otherwise, go to Completing the installation.