You can replace the support rails.
To replace the support rails, complete the following
steps:
- Remove the enclosure.
- Record the location of the rail assembly in the rack cabinet.
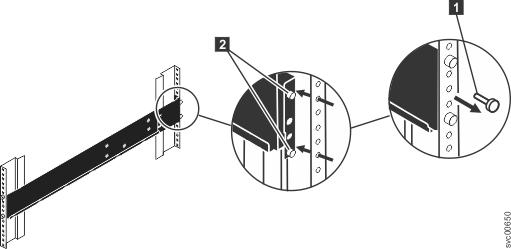
- Working from the back of the rack cabinet, remove the clamping
screw1 from the rail assembly on both
sides of the rack cabinet.
Figure 1. Removing a rail assembly from a rack cabinet
- Working from the front of the rack cabinet, remove the
clamping screw from the rail assembly on both sides of the rack cabinet.
- From one side of the rack cabinet, grip the rail and slide
the rail pieces together to shorten the rail.
- Disengage the rail location pins 2.
- From the other side the rack cabinet, grip the rail and
slide the rail pieces together to shorten the rail.
- Disengage the rail location pins 2.
- Starting from the location of the previous rail assembly,
align the bottom of the rail with the bottom of the two rack units.
Insert the rail location pins through the holes in the rack cabinet.
- Insert a clamping screw into the upper mounting hole between
the rail location pins.
- Tighten the screw to secure the rail to the rack.
- Working from the rear of the rack cabinet, extend the rail
that you secured to the front to align the bottom of the rail with
the bottom of the two rack units.
Note: Ensure that the
rail is level between the front and the back.
- Insert the rail location pins through the holes in the
rack cabinet.
- Insert a clamping screw into the upper mounting hole between
the rail location pins.
- Tighten the screw to secure the rail to the rack from the
back side.
- Repeat the steps to secure the opposite rail to the rack
cabinet.