This topic describes how to replace the battery in the
control enclosure power-supply unit.
DANGER
When working on or around the system, observe
the following precautions:
Electrical voltage and current from
power, telephone, and communication cables are hazardous. To avoid
a shock hazard:
- If Lenovo supplied a power cord(s), connect power to this unit
only with the Lenovo provided power cord. Do not use the Lenovo provided
power cord for any other product.
- Do not open or service any power supply assembly.
- Do not connect or disconnect any cables or perform installation,
maintenance, or reconfiguration of this product during an electrical
storm.
- The product might be equipped with multiple power cords. To remove
all hazardous voltages, disconnect all power cords.
- Connect all power cords to a properly wired and grounded electrical
outlet. Ensure that the outlet supplies proper voltage and phase rotation
according to the system rating plate.
- Connect any equipment that will be attached to this product to
properly wired outlets.
- When possible, use one hand only to connect or disconnect signal
cables.
- Never turn on any equipment when there is evidence of fire, water,
or structural damage.
- Disconnect the attached power cords, telecommunications systems,
networks, and modems before you open the device covers, unless instructed
otherwise in the installation and configuration procedures.
- Connect and disconnect cables as described in the following procedures
when installing, moving, or opening covers on this product or attached
devices.
To disconnect:
- Turn off everything (unless instructed otherwise).
- Remove the power cords from the outlets.
- Remove the signal cables from the connectors.
- Remove all cables from the devices.
To connect:
- Turn off everything (unless instructed otherwise).
- Attach all cables to the devices.
- Attach the signal cables to the connectors.
- Attach the power cords to the outlets.
- Turn on the devices.
- Sharp edges, corners and joints might be present in and around
the system. Use care when handling equipment to avoid cuts, scrapes
and pinching.
CAUTION:
The battery is a lithium ion battery.
To avoid possible explosion, do not burn. (C007)
Attention: Even though many of these components are hot-swappable,
they are intended to be used only when your system is not active (no
I/O operations). If your system is powered on and processing I/O operations,
go to the management GUI and follow the fix procedures. Initiating
the replacement actions without the assistance of the fix procedures can result in loss
of data or loss of access to data.
Even though many of these components are hot-swappable, they are
intended to be used only when your system is not active (no I/O operations). If your system
is powered on and processing I/O operations, go to the management GUI and follow the fix procedures. Initiating the replacement actions
without the assistance of the fix procedures can result in loss of
data or loss of access to data.
Be careful when
you are replacing the hardware components that are located in the
back of the system that you do not inadvertently disturb or remove
any cables that you are not instructed to remove.
Each power supply unit in a control enclosure contains
an integrated battery that is used during temporary short-term power
outages. You must replace the battery with the exact same model.
To replace the battery in the power supply unit of the control
enclosure, perform the following steps:
- Read the safety information to which Preparing to remove and replace parts refers.
- Follow the removing steps of the replacing a power-supply
unit procedure.
- Remove the battery, as shown in Figure 1.
Figure 1. Removing the battery from the control enclosure power-supply
unit
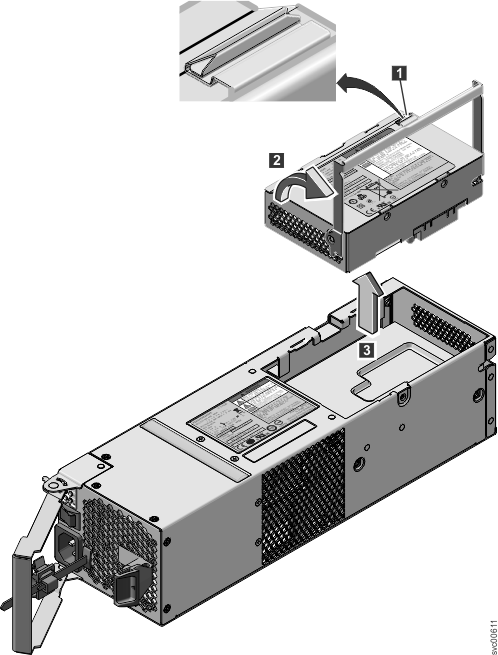
- Press the catch to release the handle 1.
- Lift the handle on the battery 2.
- Lift the battery out of the power supply unit 3.
- Install the replacement battery.
Attention: The replacement battery has protective
end caps that must be removed prior to use.
- Remove the battery from the packaging.
- Remove the end caps.
- Attach the end caps to both ends of the battery that
you removed and place the battery in the original packaging.
- Place the replacement battery in the opening on top
of the power supply in its proper orientation.
- Press the battery to seat the connector.
- Place the handle in its downward location
- Push the power supply unit back into the enclosure until
the handle starts to move.
- Finish inserting the power supply unit into the enclosure
by closing the handle until the locking catch clicks into place.
- Reattach the power cable and cable retention bracket.
- Turn on the power switch to the power supply unit.
If required, return the battery. Follow all packaging instructions,
and use any packaging materials for shipping that are supplied to
you.