Replacing a Lenovo Storage V7000 Gen2 expansion enclosure midplane assembly

A trained service provider can use this procedure to replace a faulty Lenovo Storage V7000 Gen2 expansion enclosure midplane assembly with a new one received from CRU / FRU stock.

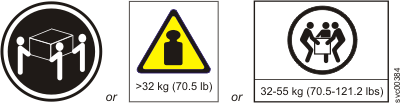
Three persons are required at step 11.
Attention: To prevent data loss, you must shut down the system before you begin the procedure to replace an expansion enclosure midplane assembly.

The expansion enclosure midplane assembly must be replaced only by a trained service provider.

There are two models of expansion enclosure. Before proceeding to replace an expansion enclosure midplane assembly, ensure the FRU part number of the replacement part matches that of the enclosure being repaired.

To replace the expansion enclosure midplane, complete the following steps.

  1. Read the safety information in Preparing to remove and replace parts.
  2. Read Procedure: Understanding Lenovo Storage V7000 Gen2 volume dependencies to determine whether to continue this procedure.
  3. Disconnect each power supply unit in the expansion enclosure from its power outlet, so that the expansion enclosure is powered off.
  4. Confirm that all the LEDs on the rear of the enclosure are off.
  5. Disconnect all cables, labeling each cable to record exactly which port it was attached to (so that the cables can be inserted back into the same ports).
  6. Carefully remove each hard disk drive and label it with the drive slot from which it was removed (so that the drives can be inserted back into the same slots). Refer to Figure 1or Figure 2.
    Figure 1. Removing a vertical style hard disk drive
    Removing a vertical style hard disk drive
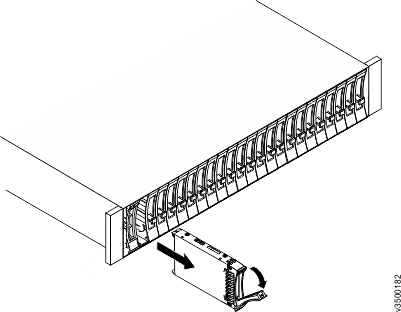
    Figure 2. Removing a horizontal style hard disk drive
    Removing a horizontal style hard disk drive
  7. Remove the two power supplies from the enclosure. Refer to Replacing a power supply unit for a Lenovo Storage V7000 Gen2 expansion enclosure for guidance.
  8. Remove the expansion canisters from the enclosure. Label them to indicate which canister came from which slot.
  9. Remove the end caps from the enclosure, as described in Replacing Lenovo Storage V7000 Gen2 enclosure end caps.
  10. Remove the two screws securing the front of the enclosure into the rack. Label these screws to indicate the location from which they are removed and place them aside.
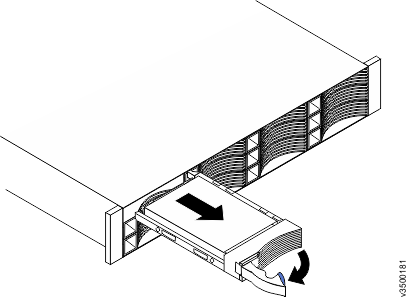
  11. Slide the enclosure from the rack cabinet, turn it onto its back so that the bottom is facing upwards, and place the enclosure on a flat surface.
    CAUTION:

    Two graphics show 3 persons carrying a heavy box; one graphic shows an icon with text warning that weight i s more than 32 kg (70.5 lb)
    The weight of this part or unit is between 32 and 55 kg (70.5 and 121.2 lb). It takes three persons to safely lift this part or unit. (C010)
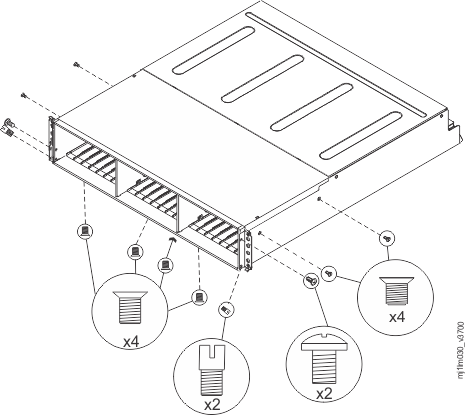
  12. Remove the four screws from the bottom of the enclosure (see Figure 3). Remove the three screws that are near the front and the screw that is near the middle. Label these screws to indicate the location from which they are removed and place them aside.
    Figure 3. Removing the screws of an expansion enclosure assembly
    Removing the screws of an expansion enclosure assembly
  13. Turn the enclosure top side up and place it on a flat surface.
  14. Remove the three screws and one screw-pin on the right side that secure the midplane assembly to the enclosure (see Figure 3). Label the screws to indicate the location from which they are removed and place them aside.
  15. Remove the three screws and one screw-pin on the left side that secure the midplane assembly to the enclosure (see Figure 3). Label the screws to indicate the location from which they are removed and place them aside. See Figure 4.
  16. Remove the midplane assembly from the chassis by rotating the midplane assembly up about 45° and then lifting it out. Set the midplane assembly on a flat surface.
  17. Unpack the replacement midplane assembly. Grasp the midplane assembly with two hands and hold it at a 45° angle.
  18. Insert the tabs on the midplane assembly into the tab holes in the enclosure and rotate the front of the assembly down.
  19. Secure the midplane assembly to the chassis on both the right and left sides of the enclosure by using the six screws and two screw-pins that you removed in steps 14 and 15.
  20. Turn the enclosure over so the bottom faces upwards and insert the four screws on the bottom of the enclosure that you removed in step 12.
  21. Reinstall the enclosure in the rack cabinet, securing it with the two screws that are removed at step 10.
  22. Reinstall the end caps at the front of the enclosure, as described in Replacing Lenovo Storage V7000 Gen2 enclosure end caps.
  23. Reinstall the hard disk drives at the front of the enclosure. Ensure that each drive is inserted back in the same slot from which it was removed.
  24. Reinstall the canisters into the same slots they were removed from.
  25. Reinstall the two power supplies.
  26. Reconnect the data cables at the rear of the enclosure.
  27. Reconnect the power to the expansion enclosure. The expansion canisters restart and the system logs an error in the event log alerting you to the unrecognized enclosure.
    Important: Step 28 writes the enclosure identity into the replacement midplane. The replacement midplane cannot be used as a replacement part for a different enclosure after step 28 is completed.
  28. Go to Monitoring > Events in the management GUI. Find the error relating to the enclosure ID of the replaced enclosure and run the fix procedure for the error.