Procedure: Removing a Lenovo Storage V7000 Gen2 node canister

Follow this procedure to remove a node canister.

Attention: Before a node canister can be removed it must be powered off or in service state; otherwise, loss of data or loss of access to data can result.

If a node canister was recently removed from the system and then readded, ensure that the canister is online for at least 25 minutes before you remove its partner canister. This delay allows multipath drivers to fail over to the online canister when the partner canister is removed.
  1. Read the safety information referred to in Preparing to remove and replace parts.
  2. Follow the steps in Procedure: Powering off a Lenovo Storage V7000 Gen2 node canister
  3. Use the LEDs on the canister to confirm that it is safe to remove the canister from the enclosure, as described in Procedure: Understanding the Lenovo Storage V7000 Gen2 system status from the LEDs.
  4. Record which data cables are plugged into the specific ports on the rear of the node canister. The cables must be inserted back into the same ports after the replacement is complete; otherwise, the system cannot function properly.
  5. Disconnect the data cables that are connected to the node canister.
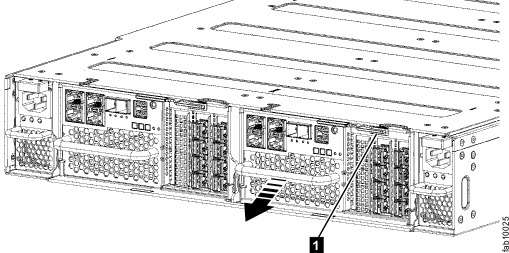
  6. On the canister, unlatch the release lever and pull it open (see Figure 1). The canister moves out of the slot approximately 0.6 cm (0.25 inch). Be careful that you do not inadvertently disturb or remove any cables that are connected to other components of the system.
    Figure 1. Removing a node canister
    Release lever that is engaged with canister ready to be removed
    Note: The number scale that is etched along the top and sides of the canister indicates how much of the canister is being supported by the enclosure. When you remove the canister, ensure that you are supporting the full weight of the canister before you reach "1" on the scale.
  7. As you pay attention to the number scale, slide the canister out of the slot.