Procedure: Removing a node canister

To remove a node canister, use this procedure.

Attention: Before a node canister can be removed it must be powered off or in service state; otherwise, loss of data or loss of access to data can result.

If a node canister was recently removed from the system, and then reinstalled, ensure that the canister is online for at least 25 minutes before you remove its partner canister. This action allows multipath drivers to fail over to the online canister when the partner canister is removed.
  1. Read the safety information referred to in Preparing to remove and replace parts.
  2. Follow the steps in Procedure: Powering off a node canister to safely power off the node canister.
  3. Use the LEDs on the canister to confirm that it is safe to remove the canister from the enclosure, as described in Procedure: Understanding the system status LEDs.
  4. Record which data cables are plugged into the specific ports on the rear of the node canister. The cables must be inserted back into the same ports after the replacement is complete; otherwise, the system cannot function properly.
  5. Disconnect the data cables that are connected to the node canister.
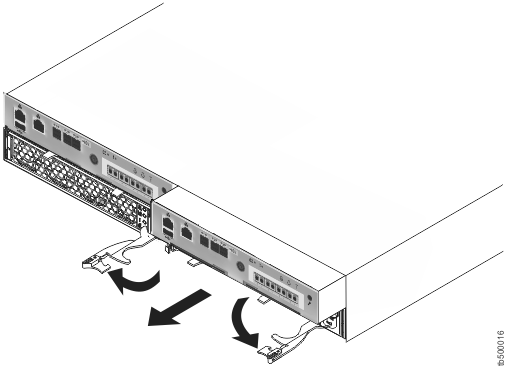
  6. On the canister, unlatch the release levers and pull them open (see Figure 1). The canister moves out of the slot approximately 0.6 cm (0.25 inch). Be careful that you do not inadvertently disturb or remove any cables that are connected to other components of the system.
    Figure 1. Removing a node canister
    Release lever engaged with canister ready to be removed
  7. Slide the canister out of the slot.
    Attention: If an enclosure contains one operational canister and the other node canister is removed, reduced airflow can cause overheating. Do not leave the enclosure operating with a node canister removed for extended periods. Instead, leave the canister in its slot until it is ready to be replaced, even if the canister is powered off.