Removing an adapter in the rear two hard-disk-drive kit

Use this information to remove an adapter in the rear two hard-disk-drive kit.

To remove an adapter in the rear two hard-disk-drive kit, complete the following steps:

  1. Read the safety information that begins on Safety and Installation guidelines.
  2. Turn off the server and peripheral devices and disconnect all power cords; then, remove the top cover (see Removing the top cover).
  3. Press down on the left and right side latches and slide the server out of the rack enclosure until both slide rails lock; then, remove the top cover (see Removing the top cover).
  4. Remove the rear two hard-disk-drive kit that contains the adapter (see Removing the rear two hard-disk-drive kit).
    • If you are removing an adapter from PCI expansion slot 3, remove rear two hard-disk-drive kit 1.
    • If you are removing an adapter from PCI expansion slot 8, remove rear two hard-disk-drive kit 2.
  5. Disconnect any cables from the adapter (make note of the cable routing, in case you reinstall the adapter later).
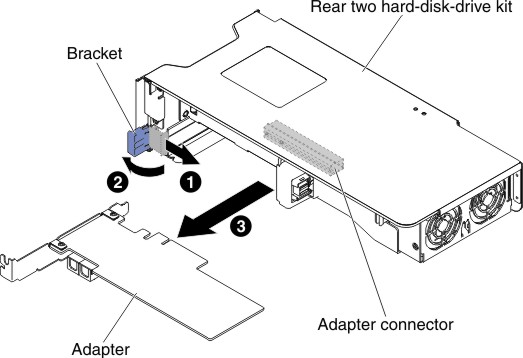
  6. 1 Slide the retention bracket; then, 2 rotate it to the open position.
    Figure 1. Adapter removal
    Adapter removal
  7. Remove the screws if present. These screws can be fastened to the side of the riser-card assembly for storage if needed.
  8. 3 Carefully grasp the adapter by its top edge or upper corners, and pull the adapter out of the rear two hard-disk-drive kit.
  9. If you are instructed to return the adapter, follow all packaging instructions, and use any packaging materials for shipping that are supplied to you.