Installing a 8x 2.5-inch simple-swap HDD ServeRAID assembly kit

Use this information to install a 8x 2.5-inch simple-swap HDD ServeRAID assembly kit.

You can install a Lenovo Storage DX8200 8x 2.5-inch simple-swap HDD ServeRAID assembly kit to support eight 2.5-inch simple-swap hard disk drives in the server. See the Lenovo ServerProven website for a list of supported optional devices. To order a 8x 2.5-inch hot-swap HDD assembly kit, contact your sales representative or reseller.

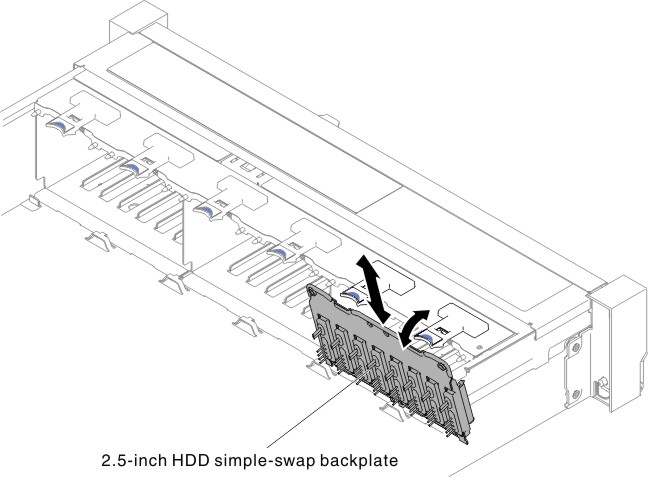
The 8x 2.5-inch simple-swap HDD ServeRAID assembly kit contains one simple-swap backplate assembly.

To install a 8x 2.5-inch hot-swap HDD assembly kit, complete the following steps:

  1. Read the safety information that begins on Safety and Installation guidelines.
  2. Turn off the server and peripheral devices and disconnect the power cords and all external cables, if necessary.
  3. Remove the top cover (see Removing the top cover).
  4. Remove the two 4-drive filler panels.
  5. Pull the hard disk drives or fillers out of the server slightly to disengage them from the backplates. For more information, (see Removing a simple-swap hard disk drive).
  6. To obtain more working room, remove the fan cage assembly (see Removing the fan cage assembly).
  7. Insert the backplate assembly tabs into slots on the bottom of the cage and push the backplate assembly forward into the release latch (on top of the backplate assembly cage) until the backplate assembly is locked in place.
    Figure 1. 2.5-inch simple-swap/hot-swap hard disk drive backplate assembly/backplane installation
    2.5-inch simple-swap hard disk drive backplate assembly installation
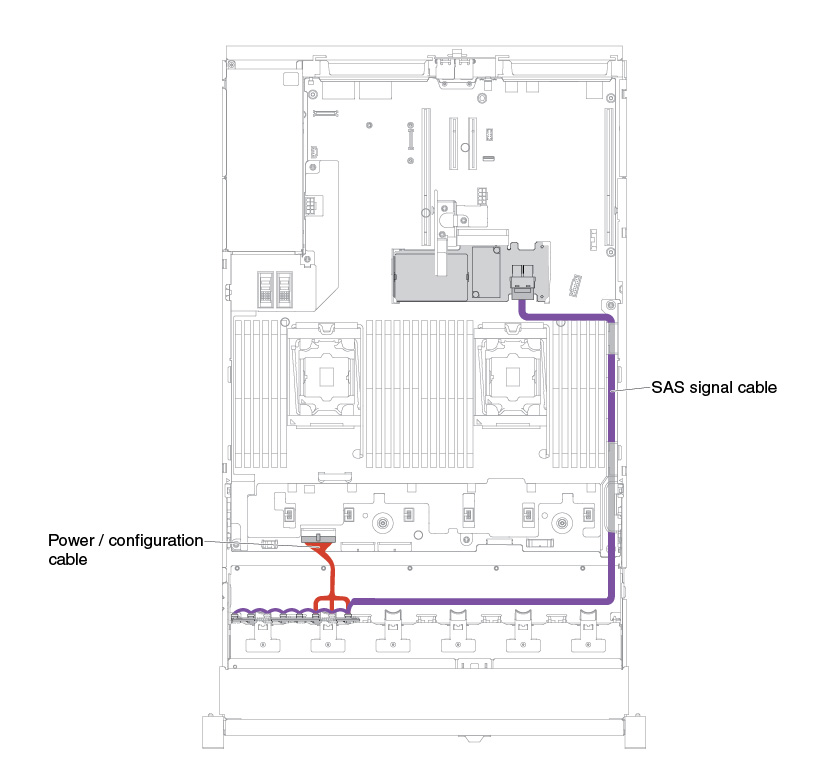
  8. Connect the SAS signal and power/configuration cables to the system board.
    Figure 2. 8x2.5-inch simple-swap hard disk drive with hardware RAID cabling
    8x2.5-inch simple-swap hard disk drive with hardware RAID cabling
  9. Replace the fan cage assembly and fans if you removed them (see Replacing the fan cage assembly and Replacing a hot-swap fan).
  10. Reinstall the hard disk drives (see Replacing a hot-swap hard disk drive).
  11. Install the top cover (see Replacing the top cover).
  12. Slide the server into the rack.
  13. Reconnect the power cords and any cables that you removed.
  14. Turn on the peripheral devices and the server.